A fairy doll about 30 cm tall, with a crocheted wig of seventy-nine strands, a crown of three triangles, two pairs of wings and a striped sundress with slits at the sides. She comes with a magic wand and a small dragonfly, and the whole thing is worked in sport weight cotton on a 2 mm hook.
Two things set this apart from the usual doll. The first is the hair: it is not sewn on strand by strand. A flat disc is crocheted as a skullcap — every second round in back loops, so the shape stays tight — and five rings of chain strands are worked out of it, each ring longer than the last and each starting higher up the head. That is the whole wig, and it is glued on flat.
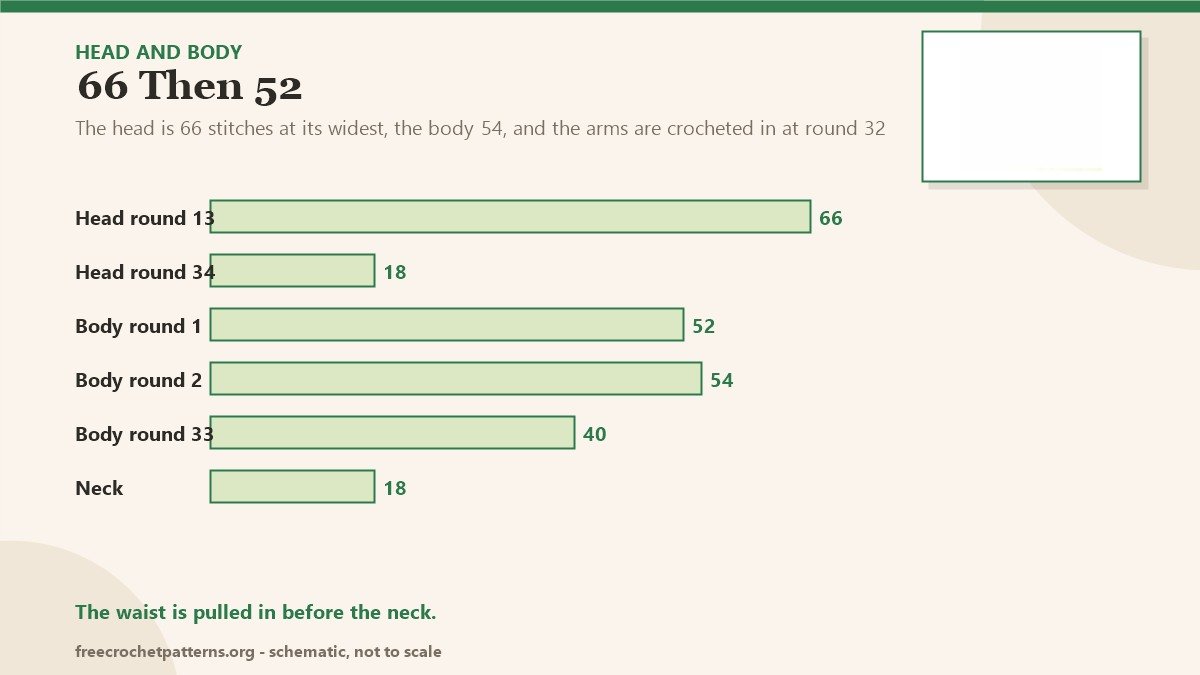
The second is the body. The arms are crocheted into the torso at round 32, then their unused stitches are picked up on the next round, and the wire that goes into the arms is twisted together inside the chest to make the neck. That wire is what stops the head wobbling, which in a doll this size is the difference between a toy and a decoration.
Every round is written out below.

What you need
- Yarn: sport weight cotton — beige for the skin, three greens for the hair and the legs, pink and light pink for the dress and the shoes, yellow for the crown and the wand, white for the wings
- Hook: 2.0 mm
- Notions: 12 mm eyes, fibre fill, pipe cleaner or wire, two buttons, clear glue, thin black thread, soft pastel for the cheeks
Abbreviations
MR magic ring, CH chain, SC single crochet, HDC half double crochet, DC double crochet, TR treble, INC increase, DEC decrease, SL ST slip stitch, BLO back loops only. US terms.
The head
Work bottom up in beige; the marker runs down the middle of the back.
- R1: 6 SC in a MR (6)
- R2: 6 INC (12)
- R3: (1 SC, INC) ×6 (18)
- R4: (2 SC, INC) ×6 (24)
- R5: (3 SC, INC) ×6 (30)
- R6: (4 SC, INC) ×6 (36)
- R7: (5 SC, INC) ×6 (42)
- R8: (6 SC, INC) ×6 (48)
- R9: (7 SC, INC) ×6 (54)
- R10: (8 SC, INC) ×6 (60)
- R11–12: 60 SC — 2 rounds
- R13: (9 SC, INC) ×6 (66)
- R14–25: 66 SC — 12 rounds
Install the eyes in rounds 19 and 20, 14 stitches apart.
- R26: (9 SC, dec) ×6 (60)
- R27: 60 SC
- R28: (8 SC, dec) ×6 (54)
- Stuff well.
- R29: (7 SC, dec) ×6 (48)
- R30: (6 SC, dec) ×6 (42)
- R31: (5 SC, dec) ×6 (36)
- R32: (4 SC, dec) ×6 (30)
- R33: (3 SC, dec) ×6 (24)
- R34: (2 SC, dec) ×6 (18)
Do not sew the opening: it is the neck.
Ears: in beige, 6 SC in a MR, slip stitch. Sew them on rounds 19 to 21.
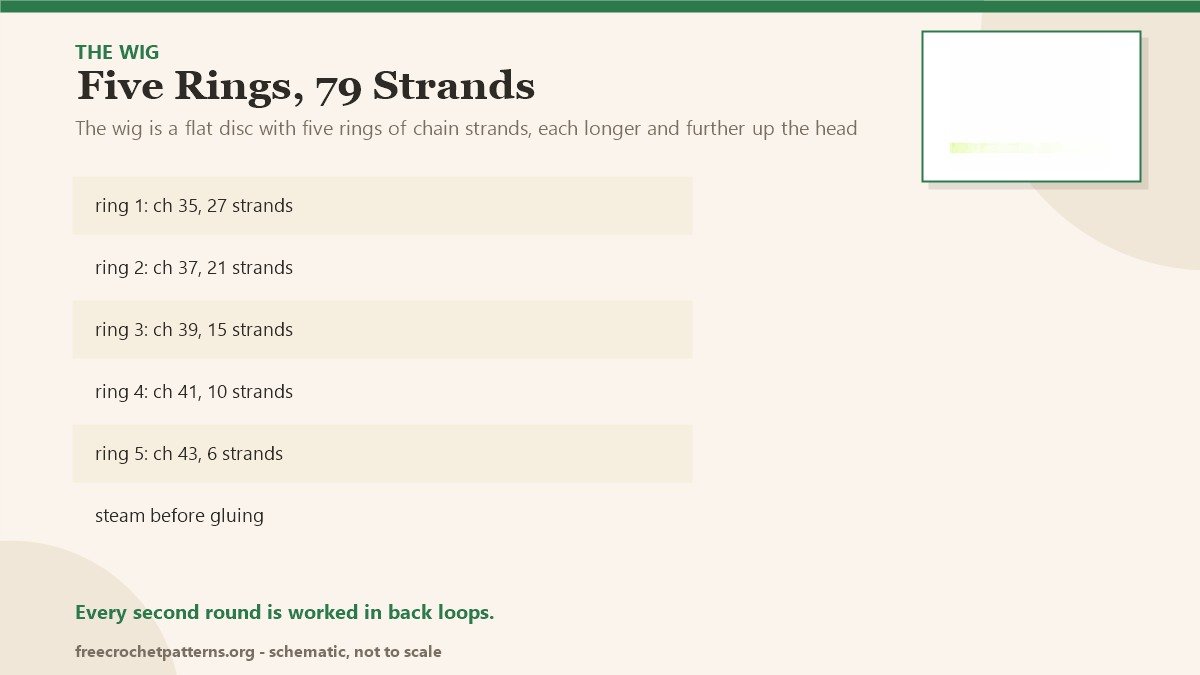
The wig
Green, and this is the piece that takes the time.
- R1: 6 SC in a MR (6)
- R2: 6 INC in BLO (12)
- R3: (1 SC, INC) ×6 (18)
- R4: (2 SC, INC) ×6 in BLO (24)
- R5: (3 SC, INC) ×6 (30)
- R6: (4 SC, INC) ×6 in BLO (36)
- R7: (5 SC, INC) ×6 (42)
- R8: (6 SC, INC) ×6 in BLO (48)
- R9: (7 SC, INC) ×6 (54)
Then the strands, worked out of the last ring:
- From where you stopped, ch 35 and work 34 SC back along the chain; slip stitch into the nearest stitch, one more slip stitch into the next stitch, ch 35, 34 SC back; repeat to the end of the round — 27 strands.
- Slip stitch in the 8th round, ch 37, 36 SC back, two slip stitches, repeat — 21 strands.
- Slip stitch in the 6th round, ch 39, 38 SC back — 15 strands.
- Slip stitch in the 4th round, ch 41, 40 SC back — 10 strands.
- Slip stitch in the 2nd round, ch 43, 42 SC back — 6 strands.
Steam the wig before gluing it so the strands hang straight, then glue it on and keep the shape of the parting as in the photos.
The face
Install or glue the eyes in rounds 19 and 20, 14 stitches apart. If you glue them, place pins to mark the sockets, do the sculpting, and only then glue. Embroider white lines along the eyes, a thin black line and the lashes; the nose goes on round 22 over 3 or 4 stitches, worked back and forth. Two or three stitches above the eyes, embroider the eyebrows over 3 stitches, 14 apart, then tone the cheeks with soft pink pastel.
The crown
Yellow, 17 stitches around, worked in joined rounds.
- R1: 17 SC, slip stitch to close (17)
- R2: ch 1, 17 SC, slip stitch (17)
- R3: ch 1, then for each of three triangles: DC into the 3rd stitch from the hook, and into that same stitch (1 DC, ch 1, 1 DC, ch 1, TR, ch 4 and slip stitch into the first stitch of the chain, TR, ch 1, DC, ch 1, DC, ch 1); skip 2 SC and slip stitch into the 3rd stitch
Sew or glue the crown on the head.
The arms (make 2)
- R1: 6 SC in a MR (6)
- R2: 6 INC (12)
- R3: 12 SC
- R4: (2 SC, INC) ×4 (16)
- R5–7: 16 SC — 3 rounds
- R8: (2 SC, dec) ×4 (12)
- R9–32: 12 SC — 24 rounds
Change to pink.
- R33–35: 12 SC — 3 rounds
The legs
Start in white.
- R1: 6 SC in a MR (6)
- R2: 6 INC (12)
- R3: (1 SC, INC) ×6 (18)
- R4: (2 SC, INC) ×6 (24)
- R5–7: 24 SC — 3 rounds
Then the striped leg: 3 rounds green, 3 white, 3 green, 2 white, and so on — the pattern alternates every three rounds.
- R19: 8 SC, ch 6, skip 6 stitches and SC into the 7th, 9 SC (24)
- R20: (2 SC, dec) ×6 (18)
- R21: (1 SC, dec) ×6 (12)
- R22: 6 dec, close the opening; stuff the foot
Attach white to the right side and work the leg shaft: 6 SC around, 1 SC at the side line, 6 SC, 1 SC at the line — 14 stitches. Two rounds plain, then 3 stitches to shift the start, then alternate green and white every three rounds for 26 rounds, and stuff the leg well.
The body
White. From the marker at the middle back of the first leg, count 5 SC anticlockwise and mark it. From the marker on the second leg, work 6 SC, ch 12, slip stitch into the marked stitch of the first leg, and start the round at the leg join: 14 SC along the leg, 12 along the chain, 14 along the second leg, 12 along the chain.
- R1: 52 SC
- Change to green.
- R2: 6 SC, INC, 24 SC, INC, 20 SC (54)
- R3: 54 SC
- R5–7: 54 SC — 3 rounds
- Green: R8–10, 54 SC; white: R11–13, 54 SC; green: R14–16, 54 SC
- Pink: R17–19, 54 SC
- Light pink: R20, 54 SC
- R21: (7 SC, dec) ×6 (48), plus 1 stitch to shift
- R22: 48 SC
- Pink: R23–24, 48 SC
- R25: (6 SC, dec) ×6 (42), plus 1 stitch to shift
- Light pink: R26–27, 42 SC
- R28: (5 SC, dec) ×6 (36), plus 1 stitch to shift
- Pink: R29–31, 36 SC
Light pink, and here the arms go in.
- R32: 3 SC, 6 SC through one side of the first arm, 11 SC, 6 SC through one side of the second arm, 10 SC (36)
- R33: 3 SC, 1 SC at the point where arm and body meet, 6 SC into the unused stitches of the arm, 1 SC at the join, 11 SC, 1 SC at the join, 6 SC into the unused stitches of the second arm, 1 SC at the join, 10 SC (40)
- R34: 40 SC
Pink.
- R35: 40 SC
- R36: (3 SC, dec) ×8 (32)
- R37: (2 SC, dec) ×8 (24), stuff well
Insert the wire into the arms, twist the two wires together to make the neck frame, then change to beige.
- R38: (2 SC, dec) ×6 in BLO (18)
- R39–42: 18 SC — 4 rounds
Then work one round of SC in pink on round 28, hook going in from below. Pin the head to the neck and sew: the stitch count of the neck and of the head opening are the same.
The shoes
Pink, marker at the back.
- R1: ch 12, 10 SC, 3 SC in one stitch, 9 SC, INC (24)
- R2: INC, 9 SC, 3 INC, 9 SC, 2 INC (30)
- R3: 1 SC, INC, 10 SC, INC, (1 SC, INC) ×2, 10 SC, INC, 1 SC, INC (36)
- R4: 2 SC, INC, 11 SC, INC, (2 SC, INC) ×2, 11 SC, INC, 2 SC, INC (42)
- R5: 42 SC in BLO
- R6–11: 42 SC — 6 rounds
- R12: 12 SC, (1 SC, dec) ×5, 15 SC (37)
Step 7 SC anticlockwise from the marker and mark that stitch. R13: 5 SC, ch 10, SC into the marked stitch, 7 SC to the marker. A longer chain makes a button loop, so the shoes can be taken off.
The sundress
Dark pink, in flat rows.
- R1: ch 49, 48 SC from the 2nd chain (48)
- R2–3: ch 1, 48 SC — 2 rows
- Then ch 21, 20 SC back, slip stitch into the belt of the skirt, and work into the back loops along the band.
- R2–24: ch 1, 20 SC, slip stitch, turn, 20 SC — 23 rows
- R26: 12 SC, leave 8 SC unworked, ch 9 and work 20 SC (8 along the chain, then as usual) — this is the first skirt slit
- R27–50: ch 1, 20 SC, slip stitch, turn, 20 SC — 24 rows
- R52: 12 SC, leave 8 unworked, ch 9, work 20 SC — second slit
- R53–94: ch 1, 20 SC, slip stitch, turn, 20 SC — 41 rows
Join the two sides of the skirt with slip stitch. Then work 11 SC at the middle front in flat rows, 5 rows, and one round of SC with an INC in each corner. Straps: ch 33, 32 HDC from the 2nd chain, two of them. Sew the straps on, sew the back panels leaving room for the wings, and sew the buttons on the front.
The wings
Two big wings, white.
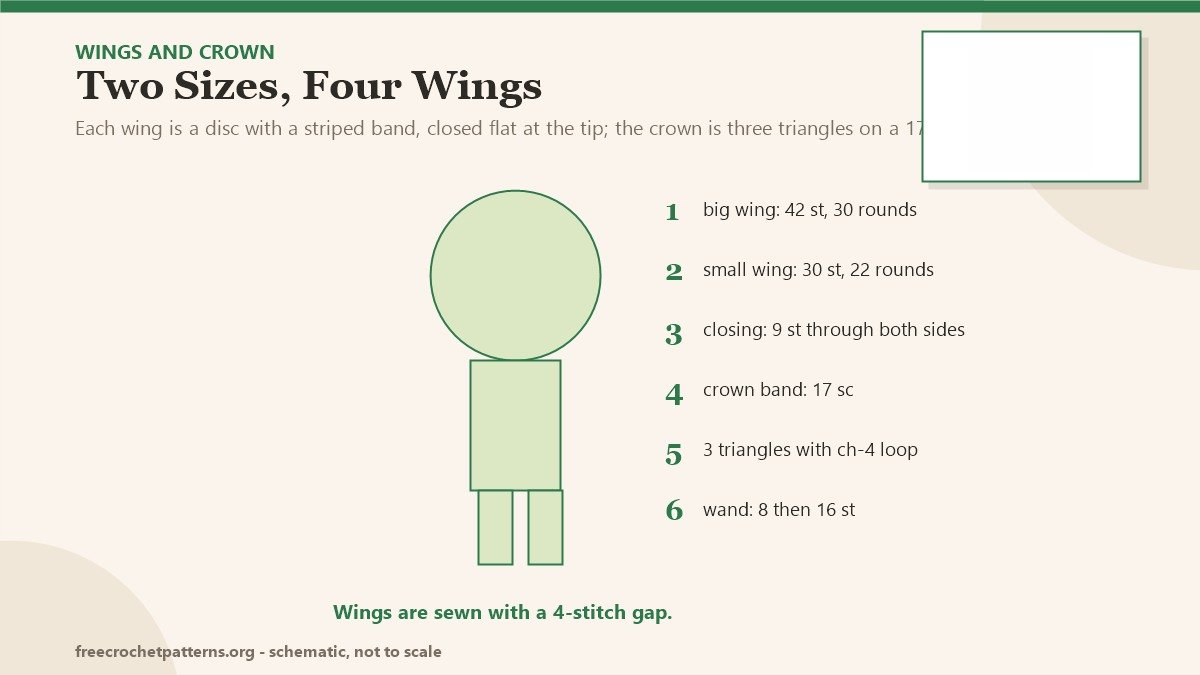
- R1–7: 6 SC in a MR, then INC each round to 42 stitches (6, 12, 18, 24, 30, 36, 42)
- R8–10: 42 SC — 3 rounds
- R11: light pink, 42 SC
- R12: white, 42 SC
- R13: alternate 1 SC light pink, 1 SC white (42)
- R14: white, 42 SC
- R15: light pink, 42 SC
- R16–17: white, 42 SC
- R18: (5 SC, dec) ×6 (36)
- R19–21: 36 SC
- R22: (4 SC, dec) ×6 (30)
- R23–24: 30 SC
- R25: (3 SC, dec) ×6 (24)
- R26–27: 24 SC
- R28: (2 SC, dec) ×6 (18)
- R29: 18 SC
- R30: 13 SC, leave 5 unworked, fold and work 9 SC through both sides
The two small wings are the same shape, 30 stitches wide and 22 rounds, ending with the same 9-stitch closure. Sew the wings with a 4-stitch gap between them.
The wand
Yellow, make two identical pieces.
- R1: 8 SC in a MR, slip stitch (8)
- R2: ch 1, 8 INC, slip stitch (16)
- R3: the points: ch 6, slip stitch/SC/2 DC/TR back along it, skip 2 stitches and slip stitch into the 3rd; repeat — five points
Put the two stars together and join them with slip stitch around. Glue a 15 cm stick, wrapped in pink thread, inside the star.
The dragonfly
Light green, head and body in one piece.
- R1–7: 6 SC in a MR, 12, 18, 24, then 24 SC for three rounds
- R8: (2 SC, dec) ×6 (18)
- R9: 18 SC
- R10: (1 SC, dec) ×6 (12), stuff
- R11: 12 SC
- R12: (1 SC, INC) ×6 (18)
- R13–14: 18 SC
- R15–22: alternate 2 rounds dark green and 2 rounds light green, 18 SC each
- R23: (1 SC, dec) ×6 (12), stuff
- R24: 12 SC
- R25: 6 dec (6)
- R26: 6 SC, then close
Two antennas: attach light green to round 2 of the head, ch 10, knot the tip; 4 stitches apart. Four wings: ch 10, then 3 SC, 3 HDC, 2 DC, 3 DC in one stitch, and back along the other side 2 DC, 3 HDC, 3 SC. Sew them with 4 stitches between. Front legs ch 12 on round 12, back legs ch 15 on round 21, knots at the ends. Scarf: ch 50 in pale yellow, a knot at each end. Face: eyes on rounds 5 or 6, 2 stitches apart.
Notes
The wig is the part that decides whether the doll looks finished. Two things matter: steam the strands before gluing, and glue the cap on flat rather than stretched — the five rings are already shaped to sit over the skull, and pulling them will open gaps at the crown.
The wire in the arms is not optional at this size. It runs from hand to hand through the chest, and the twist in the middle becomes the neck support that keeps a 66-stitch head upright.
The dress numbering in the source jumps about — the rows read 2–24, then 25, then 26 and 27–50, with a second slit at 52 — and I have kept the counts as written rather than renumbering. The two slits are at the same height on both sides, which is what makes the skirt sit over the shoes.
More dolls: Sophie the Bunny is the small dressed one, Lily Bunny is the 35 cm rabbit, and Doll Bed and Blanket is the furniture. Everything is on the patterns page.
Pattern source: Teya the Fairy.
The back post slip stitch row that colours Ollie’s hooves is the same idea as the wired neck in Ollie the Giraffe: a detail that decides how the finished toy reads.