
Holiday Crochet Part 2 T Kristi Bergin-Smith and The Burgundy Basket, 2019. Unauthorized use and/or duplication of this material without express and written permission from this site’s author and/or owner is strictly prohibited. Excerpts and links may be used, provided that full and clear credit is given to me, Kristi Bergin-Smith and The Burgundy Basket with appropriate and specific direction to the original content.
Materials:
Assorted. I have written most of these patterns with "stash busting" in mind. I have a huge assortment of old yarn and odds and ends yarns from a vast collection of mostly thrifted bags of yarn. Most all of what I am using is 4-ply worsted weight yarns like Red Heart Super Saver. I will note any changes and give you the best idea I can on what to use to make each pattern. Gauge isn’t important for most of these patterns. I will have a full list of all products used for each pattern at the start of that pattern. Hooks : Hook sizes will vary greatly for all of these patterns. I will note at the start of each pattern the
hook/hooks that I have used.
Stitch Glossary:
Chain: Ch Single Crochet: SC Inc Sc: make two single crochet stitches in the same stitch as indicated Invisible Decrease: inv. dec. – this is an invisible single crochet decrease Hdc: Half double crochet Dc: double crochet Tr: treble crochet Slip Stitch: sl st FO: finish off "Have a Holly, Jolly Christmas; It’s the Best Time of the Year" These Christmas balls are not only super easy, but they are fun and fast! But, be on the lookout after the Holidays for the supplies and buy them at clearance prices. I found these at my local Hobby Lobby and they are huge! They are labeled 6" and at first you think 6" isn’t
giant, but being spheres they just seem so much larger – especially after the crochet work goes on and the topper gets added.
Materials: in addition to the foam balls and toppers, I
have again – one of my favorite ways to make plain colors exciting and to "stash bust" – I have held two strands together for these and used my K/6.5mm hook. If you need a photo tutorial on how to start the crochet work please go back up in the pattern to the toe of the stockings because you will work the start of these balls the same way – BUT, if you have different size foam balls than mine please adjust the increase rows to fit your foam balls.
Working in the CONTINUOUS Round:
*I do not join and chain, but continue to work in the next stitch. Use a stitch marker for this so you don’t lose your place.
Starting/Increasing:
Chain 2. Single crochet 6 in the second chain from the hook and work over your starting tail. Starting in the first sc make 2 sc in that stitch and in each stitch around. (12) *Still work over the starting tail. After getting done with all 12 sc for that round, pull the starting tail to cinch up the opening. You can now trim that tail or weave it in or just leave it if it will be on the inside of your work. You want to move your stitch marker to the last stitch of each round so you know when you get to the end. Round 3: (Make 1 sc in next stitch, make 2 sc in the next stitch) repeat around (18)
Round 4: (Make 1 sc in next 2 stitches, make 2 sc in the next stitch) repeat around (24) Round 5: (Make 1 sc in next 3 stitches, make 2 sc in the next stitch) repeat around (30) Round 6: (Make 1 sc in next 4 stitches, make 2 sc in the next stitch) repeat around (36) Round 7: (Make 1 sc in next 5 stitches, make 2 sc in the next stitch) repeat around (42) Round 8: (Make 1 sc in next 6 stitches, make 2 sc in the next stitch) repeat around (48) Round 9: (Make 1 sc in next 7 stitches, make 2 sc in the next stitch) repeat around (54) When you get to this part you want to have your crochet fit just a little larger than your
ball. You want it to be snug when you get done with your crochet work, but you don’t want to stretch your stitches. So, fold it around the top of your ball and see how it fits. It should look "loose" around the edges. If you need continue in the increase pattern above and make more increases or if you think it’s just way too large pull back a row. You can see how it should "bowl" up a little and have some gaps around the ball. Rounds 10-17: sc in each stitch around (54) After doing a few rounds you might want to check for
size again:
Continue working in rounds. Round 18: To go from 54 to 48: (Make 1 sc in next 7 stitches, make an inv dec over the next two stitches) repeat around Round 19: To go from 48 to 42: (Make 1 sc in next 6 Round 20: To go from 42 to 36: (Make 1 sc in next 5 Round 21: To go from 36 to 30: (Make 1 sc in next 4 ***Once I got here to 30 stitches around, I inserted my foam ball. If you are using balls like mine and they have a hole make sure you put the hole facing you. It might be a little tight – just stretch it and pop it in. You will have to do the rest of the decreases with the foam inserted. Just pull out the stitches a little as you work into them.
Round 22: To go from 30 to 24: (Make 1 sc in next 3 stitches, make an inv dec over the next two stitches) repeat around Round 23: To go from 24 to 18: (Make 1 sc in next 2 stitches, make an inv dec over the next Round 24: To go from 18 to 12: (Make 1 sc in next stitch, make an inv dec over the next two stitches) repeat around. Round 25: make one sc in each stitch around (12) and leave a tail to weave opening shut. I use only one of my two tails to weave shut and then when you come back around tie the two together and hide tails with your needle under a few stitches. This blue and teal ball is worked with the exact same
pattern as above, but I have worked in the Back Loop Only (BLO) all the way around. "Deck the Halls with Boughs of Holly": Trees #2 & #3 *this ombre tree is my favorite tree! I love it <3 Yarn: I have written most of these patterns with "stash busting" in mind. I have a huge assortment of old using is 4-ply worsted weight yarns like Red Heart Super Saver. For these two trees I have used green from my stash. For the smaller tree, I alternated two colors and for the larger tree I tried to put them together in a sort of "ombre" method and used 7 different greens. All of these skeins and balls were scraps so you won’t need
much of each one and you can easily change to a different green – or white or any color! – if you run out. Hooks: For these trees I have used my I//5.5mm hook for all the "discs" except the topper of the tree and for the top I have used my H/5.0mm hook. These are the hooks I typically use for 4-ply worsted weight yarn, but please use the right one for your yarn. You definitely don’t want stiff "discs" so don’t use one too small. Other supplies: I have used cardboard cones that you can find in most craft stores, some craft paint to paint the core, and my steam iron. You will find at the end that steaming the "discs" really makes a huge
difference in not only how each disc lays, but also the way it looks at the end. You can use a regular steam iron or a garment steamer. I just used my steam iron and laid them on my ironing board. For more information on how to steam your crochet work there are many online descriptions – basically you just steam it. Don’t touch your work, but steam about 1-2" away from the pieces. You will see how soft and relaxed they becomes. You may need your glue gun if you want to secure them forever so they don’t move. First thing to decide is how many layers or "discs" you want your tree to have. I chose 6 for the small one and 7 for the larger one. You can
easily do less layers and then add more rows to each one. You can switch it up and make completely different looking trees. After you decide on how many layers, decide on where on the cone they will "sit." One thing to remember is that after you make your chain and join it to form a circle, it will get BIGGER after you crochet in it and it will also get a little bigger if you decide to steam it – SO, what I suggest is make your chain a bit smaller than what you want. You can easily add an extra disc if you need at the end – BUT, if you get all the way done and your disc ends up still too big for your cone, simply
weave a strand of yarn in and out of the part closest to the cone and pull tight and tie (I did this for my bottom disc on my large tree since it ended up being too low on the cone) IDEAS: String on some beads before you start and pull one up on the last round for "ornaments." Add some white fluffy yarn on the last round for "snow." Use some metallic yarn for "tinsle," So, the first step is to chain the number of chains you want for where you want it to sit on your cone. I tried to stick with multiples of 5. For example, on my large tree my lowest disc was a chain of 50 – after that I shortened each starting chain like this:
45, 35, 30, 20, and 10. So, chain around and join and then chain up 3 (for this pattern chain 3 DOES count as a double crochet) – after you chain up 3 and double crochet around in each chain join to the top of the chain 3 and that completes the first round. (See photo above) – you can check fit again here if you want. Round 2: Chain up 3 and make 2dc in each double crochet around. Join to the top of the chain 3 and chain up 3 again (do this for each round) Round 3: Double crochet one double crochet in double crochet around. Round 4: Repeat Round 2 Round 5: Repeat Round 3 You can decide now if you want to continue to do an increase
round (Round 2) or work straight a few rounds until you reach the length you want. Most of my discs had 5 rounds and then I did a final round of half double crochet. The increase rounds are what makes the discs "wavy" at the end and helps them drop down. For the small tree I just finished in a simple half double crochet, but for the large tree I did a chain 3 between every 5 hdc – so, it would be (hdc in next 5, chain 5, hdc in next 5) repeat. The top of the tree is made a little different. Starting with your smaller hook, chain 2. In the 2nd chain from the hook make 4 sc. Round 2: Join and chain up 1 and make 1 sc in each stitch around. (4 sc)
Round 3: Join and chain up 1 and make 2sc in the 1st sc and then sc in each of the rest of the stitches around. (5 sc) Round 4: Join and chain up 1 and make a sc in each stitch around. (5) Round 5: Join and chain up 1 and make 2sc in the 1st sc and then sc in each of the rest of the stitches around. (6 sc) Round 6: Join and chain up 1 and make a sc in each stitch around. (6 sc) Round 7: Join and chain up 1 and make 2sc in the 1st sc and then sc in each of the rest of the stitches around. (7 sc) Round 8: Join and chain up 1 and make 2sc in the 1st sc and then sc in each of the rest of the stitches around. (8 sc)
Round 9: Join and chain up 1 and make 2sc in the 1st sc and then sc in each of the rest of the stitches around. (9 sc) Round 10: Join and chain up 1 and make 2sc in the 1st sc and then sc in each of the rest of the stitches around. (10 sc) Round 11: Join and chain up 1 and make 2sc in the 1st sc and then sc in each of the rest of the stitches around. (11 sc) Round 12: Join and chain up 1 and make 2sc in the 1st sc and then sc in each of the rest of the stitches around. (12 sc) Round 13: Join. Chain up 3 and make 2dc in each double crochet around. Join to the top of the chain 3 and chain up 3 again (do this for each round) (24dc)
Round 14: Double crochet one double crochet in double crochet around. (24) Round 15: Repeat Round 13 *you may decide you don’t want to increase again and just work straight up. Round 16: Repeat Round 14 *repeat this row for the length you want. Assemble. I can’t STRESS enough how much difference it makes to steam your discs. It’s a huge thing! It makes your cheap, 4-ply old yarn into a soft, fluffy, nice draping tree. Look at the difference before and after steaming. I painted my cone and then while the paint was drying I steamed all of my disc. "This is that time of the year, A tinselly, glittery time":
Garlands Okay, so, this part of my 12 Days of Christmas patterns really isn’t going to be so much of a pattern exactly – it’s gonna be a "use your stash" talk and "keep it simple" talk. Many times, I find myself looking at all the amazing, intricate and complicated projects and forget the simple things. I personally like big crochet – have you seen my giant Farm Animal Series? They are from 22-30" and massive! So, when I think about stopping for a minute and just switch to something simple, I sometimes feel that it’s inadequate – so, I have to remind myself to stop it. Really though – I know we all have a stash to work through.
I often score huge bags/baskets/bundles of yarn and in those lots I will sometimes have yarn like in the above picture – and honestly – I don’t like this yarn. I have no idea really what it’s meant to be for. You can’t make clothes/hats/scarves etc. because the metallic part is itchy and the other one that has no metallic filament (bottom of picture) works up weird – the colors don’t play right. And, I am into way different colors than these for Christmas – as you can probably tell from my other patterns. So, back to it – these 12-days of Christmas patterns were written to DE-STASH all of my Christmas stash that I’ve been hoarding for a few years probably. So, when I looked at all of
this above, the only thing I could even think to do with it all was to make some old-fashioned Christmas garland – so, I did! I made 4 to be exact. I will add some pictures and let you know what I did, but it’s super easy and you can do it mindlessly while watching your favorite show. I know that I can’t be the only one with some old, ugly Christmas yarn needing a good use. You can even do these with scrap yarns. Okay, let’s start with Garland #1: For the first garland, I grabbed the green and red metallic, my big bucket of pony beads (don’t know where these came from or why I have them – they are just part of my stash that needs
to go) and my yarn needle (use a soft bendy one for this is you have it). I threaded onto both strands held together 250 pony beads. Get them all on and move them down your strands. The most tedious part of the project is constantly having to pull more yarn to work with through, but it goes pretty fast once you get started and as your beads get used it gets easier. I used my L/8mm hook, but please use whichever size you want/need to get it to look like you want and not be difficult. For this first one I just chained 10 and pulled up a bead, chained 10, pulled up a bead and repeated. I did this all the way down for all of my 250 beads. It actually turned out quite
pretty. It’s really long too, so you can fold it in half to double the thickness and twist or add some knots down the length to keep it that way. And Voila! One garland down. Although I am not a fan of the two above yarns individually, I really do love them together and with the beads. If I had my tree put up already I would photo there – but, we are Thanksgiving tree-putter-uppers.
Okay, now onto Garland #2:
For this second garland, I grabbed these two skeins I had and held them together and used my L/8mm hook again. I just did simple back and forth rows. I have a big bag of (stash) pompoms and I think I am going to attach them to this garland, but that part isn’t finished yet. This would be a good one for kids to "decorate" – I started with a chain 5 and did 4 hdc in each row. I just worked until I ran out of yarn. Now, this is the best part – when I finished working I had 114" of a big giant belt (ha!) – but, I took it to my ironing board and steamed and then stretched it all along the length steam, stretch, steam, stretch. I was not worried
about ruining this yarn because it’s garland…it made my "belt" long and skinny and I ended up with 160" for almost no extra work! Now, I don’t think I am done with this – like I said I am going to attach something to it I think. I did go down and put some knots in the length. This piece would be fun to add some leftover ribbon to – even some led lights and ribbons. You are only limited by your stash and imagination. For Garland #3 I grabbed these bits of leftovers: I – again – holding these two strands (it really does make an ugly or boring strand better) threaded them with this bowl of pearly white
beads from my stash (and, again, I don’t know why I have them and am just relieved to get knocking them out!) – I threaded the whole bowl. I don’t even know how many it was. This one actually has a sort of pattern and it’s my FAVORITE! – I love how this one turned out. I grabbed my J/6mm hook for these two strands. I started with a chain 10 and then did a half double crochet (hdc) back down/up the chain, then I did this repeat: (chain 25, slip on 3 beads, hdc in the 3rd chain from the hook and in the next 13-15 chains)* – you get this fun dangly piece with all these fun little curls all over it.
Garland #4 is so boring that I almost didn’t even include it, but then I remembered that it’s garland and sometimes things are boring (ha!) so, I was kind of tired of beads and garland by the time I got down to the end of my stash. I had run out of the green yarn from garland #3 above, but still had a bunch of white beads on my other strand and plenty of it left so I just chained 20, slipped up a bead and repeated until I finally – finally! – ran out of almost my entire stash from the first photo above. I only have some colored beads and two small balls of christmas yarn leftover. Hallelujah! So, anyway, this piece was so long! I fold it in
half and tied it in knot going down (a faux popcorn stitch!). What a stash-busting relief! "As the shoppers rush home with their treasures" Gift Bag #2 Gift Bag #2 is more of a "formula" than an exact pattern. It is a photo heavy tutorial on how to make your own custom-sized reusable gift bag in ANY size. This bag is so fabulous it makes any gift even better! It can also be used as a tote bag or purse. Materials: any yarn you want (I used two strands of 4-ply worsted weight yarn). With this "formula" you can pretty much use any yarn, but for a nice, sturdy gift bag I encourage at least two strands of 4-ply yarn. I used my J/6mm hook to keep the fabric stiff. You will also need
some type of sturdy material for the bottom of the bag. I used plastic canvas, but you can also use a thick piece of cardboard or other similar sturdy material. To start you need to decide what measurements you want your bag to have. You’ll need to know the width (from left to right with the bag facing you), the depth (from front to back with bag facing you) and the height you want. Once you decide the measurements you want, you will start with the piece that will make up the front, back and bottom. Chain the desired width *note: your chain is going to grow by as much as � an inch after you start crocheting your stitches into it. So, if you want your bag to be 10" wide you should
start with a 9.5" chain and see how that goes. I chose to work in half double crochet, two strands held together and did a chain 1 and turn after each row. Single crochet would also make a very nice bag. You will crochet in rows working back and forth to make a long piece of fabric that will be the height of your bag x 2 + the depth of the bottom. So, if you want to make a 12" high bag that is 6" in depth you will add 12+12+6+30. You first piece of fabric needs to be 30" high. Just lay flat and measure as you go. You don’t want to pull or stretch your work. Just work mindlessly back and forth until you have the
measurement that you need. My bag in the photos was going to be 14" wide and have a 6" front and back with 4" of depth – so, 16" For the second piece of fabric you will be also working in rows – but, your width of the fabric is going to be the depth of your bag. So, in your example of a 6" depth, the second piece of fabric is going to be worked in 6" rows. *so, your starting chain should be around 5.5". In my example for my shorter, wider bag I had a side piece of 4" The length of this piece is going to be the width of your bag (in my example I needed 14" plus 6" on each side so 30". *you want all your "height" pieces to be
the same so measure all the parts that don’t overlap in the photo below and make sure your height is the same all the way around. Now, skip on down for more photos for
the next part:
This part involves measuring and cutting your canvas or cardboard. This piece gets inserted between the two overlapping bottom layers to provide support for you gift. It needs to be just a bit smaller than your side/gusset piece because you are going to stitch it in between those layers and don’t want it to poke through – SO, if you are using plastic canvas like in my example and trim it make sure to get all those little jagged edges off and have smooth sides. See my photo here on where it goes and how you need to position it. Now, make sure you have the same amount of fabric on each side of the piece you are using (in
my example, I made sure to have 6" on each side of the plastic canvas) Now, to keep this piece secure add a few running stitches to hold it in place. If you are using cardboard you might need a few streams of hot glue between the layers. You don’t want this piece to shift while you are sewing the layers together. I used some matching yarn and just stitched along the sides. I didn’t bother securing the stitches at all until the final part of sewing all the layers together. Now, flip your side piece with plastic canvas attached under your main piece. The canvas/cardboard goes in between the two layers and should not be visible. Measure again
before you stitch the pieces up – you can’t measure enough! Make sure all of your "height" pieces are exactly the same or at least as close as you can possibly get. Now, using whatever yarn/thread you are going to use to sew your pieces together, start stitching the bottom pieces together as I have in these next photos: You will first want to stitch all along the bottom – all four sides. This is easiest to do before you sew up the sides. Now, pin up all 4 sides evenly and start stitching. I used a contrasting color and made my stitches visible and fun, but you can choose how to do this part. I started in one upper corner and worked
down to the bottom section and then tied that leftover tail from the bottom with and working thread and then weaved in the ends. I chose to go back over the bottom in my colored yarn and up the next side to stitch together and across and back down the bottom and repeat- it made a fun, colorful border of "sewing" in my 4 corners and on the bottom. The next part is just making some fun handles. I chose to make 6 strips – three for each side and pull them through – one strand per three stitches next to each other- knot – braid – pull through three stitches on opposite side, and knot. Now, with this "formula" you can make any size bag. And this is a great stash buster!
*My little gift bag is for this "Put your feet up and Chill" gift bag with cozy wool socks and a bottle of wine. Add a gift tag or whatnot and it becomes part of your gift. <3 "City Sidewalks, busy sidewalks dressed in holiday style" Trees #4 and #5 are more of a "formula" than an exact pattern- like the gift bag above due to the fact that cone forms come in so many different sizes – so, with these two you can adapt them to the size you need. I am using a big bag of scrap green yarn, two cardboard forms, and my I, J, and K /5.5/6/6.5mm hooks. You will also need your glue gun for these two trees. I used one or two strands of 4-ply
worsted weight yarn (I will make notations as we go) and in one case I had 3 small skeins of sport weight #3 green that I held all together. I will note all that for each part below. It is a photo heavy tutorial on how to make your own custom trees. The first step for the large tree is to crochet a "slip cover." I chose to crochet double crochet since I was adding layers on top and not terribly worried about seeing any of the cone through my cover, but if you prefer you can easily change this to single crochet or half double crochet. You are basically going to crochet a cone shape. What that means is basically this:
Chain 2 or 3 (depending on what stitch you are working) Make 4 stitches in the first chain (the one farthest from the hook) – that is round 1. For each round you will add at least one – and sometimes 2-4 stitches – for me I did: Round 2: Double crochet (dc) 5 around. Round 3: Dc 6 around Round 4: Dc 7 around Round 5: Dc 8 around ….etc Just keep increasing. Every few rows you want to try your slip cover on your cone and see how it fits. If you find that it’s snug pull back a row and make a few more increases. If it seems okay, but you feel that you need a little more room use the next row to add a few extra
increases. On some of my bottom rows I was adding 4 increases per row. This part is largely up to your cone, your yarn, your tension, your hook etc. Just keep trying it on your cone and make the needed increases in whatever stitch you choose. On the second to the last row I made sure to have a multiple of 5 stitches so that I could make a shell bottom – so, when you see that you have just a few rows left start counting so you get to a multiple of 5 stitches…then, on the very last row do a shell end if you want. For the shell row: join and chain up 3 (counts as a stitch) and make 2 double crochet in the
same space. (Skip 2, Dc 5)* repeat around until you get back to the beginning 3 dc and make 2 more dc in that first space and finish off. See the photo above. For this next part, I grabbed my old "stash" yarn. I had 3 small skeins of sport weight green. I held all three strands at once and used my J hook. A good sub for this would be 2 strands and your K hook or whatever hook feels comfortable for the weight yarn you are using. You can even single ply this – although it will take a lot longer to finish – and part of my 12-days of Christmas patterns is to use your stash and not spends days and days to make some fun holiday items. So,
grab the yarn you want – even two colors will be nice — and the hook you want and let’s get started. I started with a chain 32 and then made double crochets all the way back up the chain. Once I reached the top I chained 35 and chained back up the chain 32 times (I left a space of 3 between each "branch")..repeat – chain 35, double crochet 32, repeat…you can vary this a little as well to have slightly different lengths – maybe chain a few more or less etc. When I got near the end of my yarn skeins I started decreasing both the length of each chain and also the spaces in between the branches – so, for example, chain
24, double crochet up, (repeat a few times and leave only 2 spaces in between the branches up where you start your chain) – chain 20, double crochet up, repeat a few times, chain 16, double crochet up and leave only one space between branches, etc. I didn’t have a set pattern for this just gradually decrease the chain length to form shorter "branches" up near the top. My last few chains were 10- 12 in length with NO spaces in between. At the very end when your yarn is nearly gone just chain a bunch until your yarn ends or you have about a foot in length of chains. This is what I ended up with ^
You can see the short ones up at the top and my chain at the end. This part is super important to get the branches nice and relaxed and straight – take it to your ironing board and steam them down. If you don’t you branches will be curly *of course, if you are using just a single strand of yarn and big enough hook this may not be the case for you – but see the HUGE difference after steaming them down? Now what you want to do is hold them up to your cone with your slip cover on and position them so the bottoms of your longest branches hang to the bottom of your cone. Gradually wrap and pull and wrap and pull and use your hot
glue gun to secure in a few place along the way. I used the tails from where I started my work to tie on the first row and make sure it was winding up like I liked before I started securing with the glue. As you wrap you can pull tight or keep a little loose so that the long branches on the row above hang down in between the branches below to fill in all the gaps…see in this photo how I am trying to make sure to get the branches spaces so they fall in between the ones below? This part is easy to manipulate. Make a few rounds and get them like you like before you add just a little drop of hot glue to the top of
the branch where it lies against the slip cover. Once I got to my chain end I just spaced it out kind of even and then worked back down again. This part is not going to matter at the end because this gets covered up. This is what I ended up with after doing up my
first layer of branches:
Now, you may be lucky enough that your yarn ended up just right and you had just enough to completely fill up your tree. My cone is the large 23" cone and this first layer of branches was not enough – so, I went back over to my stash and ended up grabbing this fun white cotton with flecks of green and red. I decided to make some snow covered branches. I held one strand of the cotton yarn with one strand of a 4-ply worsted weight green and used my K size hook. I repeated the same type of process that I used for the first layer, but I wanted to make individual layers that would "fill" in where I needed them. So, making shorter chains
and leaving less space between the chains I make a few extra layers- just figure out where you need to fill in some gaps and make your extra branch layers fit just around that part of your cone. I ended up make two sets like this for the top of my tree with shorter branches and less/no space between them. For the top two extra layers I did chains between 9-16. If you leave a long tail before and after you can just tie these around and secure the ends under another branch.
For the "cap" of the tree you will:
Chain 2. Make 6 sc in the 2nd chain from the hook and then for the next round make 6 sc again. You can choose to work in the spiral or join and chain up 1 if that is what you prefer. It won’t make any difference on this piece. Round 3 is (sc, sc, sc2) * repeat once more (8sc) Round 4 is one sc in each stitch around (8) Round 5 is (sc, sc, sc, sc2)* repeat once more (10sc) Round 6 is one sc in each stitch around (10) Round 7 is (sc, sc, sc, sc, sc2)* repeat once more (12) Round 8 is one sc in each stitch around (12) – slip stitch in next stitch. I chose to work the rest of the cap in hdc – but, again, you can change to sc or dc if you prefer.
You have 12 sc on the last round above – the last part of the cap will get 6 branches. You can chain the length you want – I did around 10 – So, where you left off above you will chain the length you want and work the stitch you choose back up the chain – slip stitch in the next chain and in the next and repeat for each branch. Each branch takes up two spaces on Round 8 – so, you work your chain and get back to the cap and slip stitch in the next and then slip stitch in the next to start your next branch. Attach to the top of your tree. I added a little glue to keep it secure. *I know, it kind of looks like a jellyfish =)
After I secured all of my extra snowy branches and cap, I still had a gap in my work up top, but it needed a green set of branches, so I pulled out a few more strands of green and repeated one more set of branches for the top to fill in the space. Repeat this as many times as you need to get the fullness that you want. Just remember to keep your longer branches on the bottom and make shorter ones for up top. For all of my add on branches, I just used the tails to tie the on and then used a dab of hot glue and covered the cut ends with one of my branches above it. I love the way this tree turned out – its kind of
"hairy." This next small tree is super easy, but you may find it more tedious then the others because you are just going to make circles, circles, and more circles. I used – again – two strands because I want fast and stash busting – but, I also really love combining two kind of ugly or plain colors and coming up with something fun. I used 2 strands of 4-ply worsted weight and my K hook again. *do not join and chain, but continue to work in the next stitch. Use a stitch marker for this so you don’t lose your place if you need. You can now trim that tail or weave it in or just leave it if it’s short because these will be glued
down. Make a bunch of these "medallions." I made about 6-10 at a time and then got up and went to my ironing board. YOU WANT TO DO THIS PART: You need to set your iron on the high setting and get a bath rag (or something similar) and wet it so the rag is not dripping, but more than damp. Cover your medallions with the wet rag and place the iron on them completely covering them for about 7-8 seconds. This is called "killing" or "flattening" the yarn. You get a huge difference in how your medallions look – they look flat of course – but also special – a little vintage – a little wool like and they are going to look so much nicer on your cone if you do not skip this step. The top
left photo is before and the right is after. After I had a big handful, I went to my glue gun and started the layers. Start with the bottom and slightly overlap and then work your way up. After getting a row secure on the top and bottom, I pulled the tails from each medallion down on the side under the pieces and glued and secured each side. Then you can carefully snip off any hanging yarn. Repeat this all the way up. When I reached the top, I realized that 4 of my regular size would probably be too much – it would be too big, but 2 was not going to be quite enough so, I made three for the final layer that went up one
more round. So, repeat like the above medallions, but add a round 3 like this if you need a few large ones for the top: Round 3: (Make 1 sc in next stitch, make 2 sc in the next stitch) repeat around (18) And, again, you need to make a small cap for the top of this one as well to hide that pointy part. The one in my example is just a starting circle of 6 with a few rows of 6 stitches. This may vary depending on your tree. After completing my tree, I ended up adding some buttons. *my tree looks yellow in some photos, but my yarn is sage and green. "…while visions of sugar plums danced in their heads"
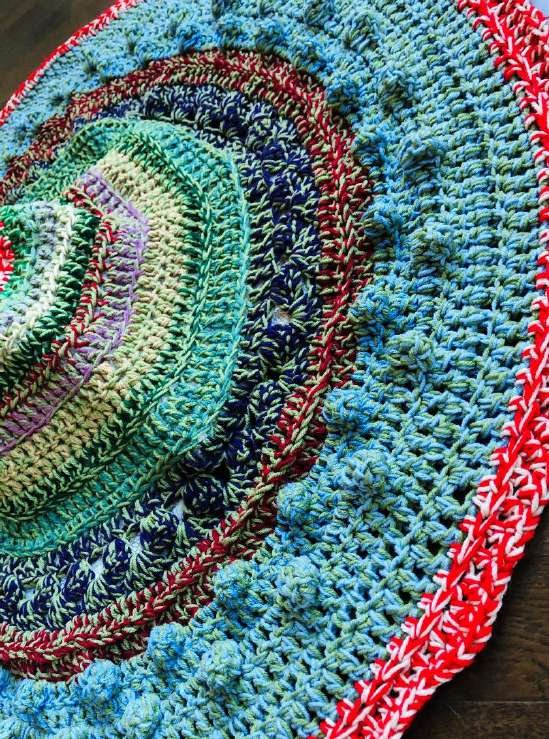
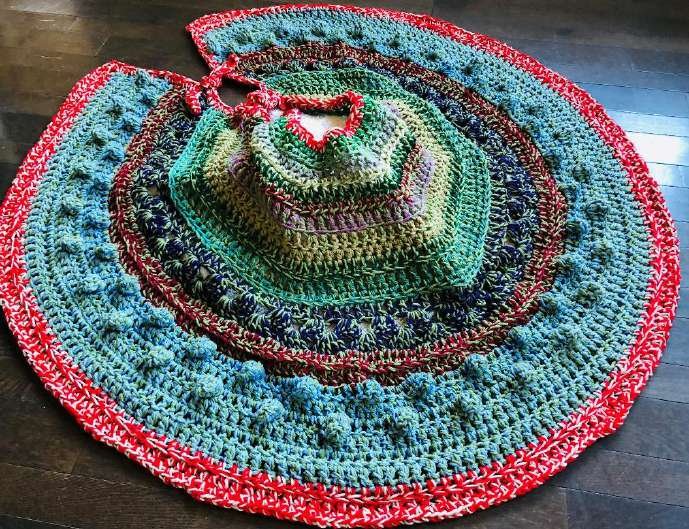
Materials: Two strands of 4-ply worsted weight yarn held together, N/10mm Notes on this pattern: This is a stash busting pattern. I have used tons of yarn. I held together two strands throughout this project and some of my yarn had no labels. What I can say is that you will need at least 4 skeins (or yardage equal) to Red Heart Super Saver 8 oz/225 g and 2 small skeins of the 3.5 oz Red Heart type yarn. I derive this amount from the fact that I used two large skeins of green throughout the tree skirt and ran out on the last few rounds where I then added the two small skeins held together and used MOST of those. BUT, this is a
GREAT scrap yarn project. You can change colors where you run out of yarn. I tried to change colors just on the ends, but this part is up to you. My skirt ended up being about 48" across. I did NOT count my chain 1 or chain 2’s as a stitch when I worked this project. You can chose to do the way you prefer, but I have not specified this in the pattern. Typically you want to chain 1 and turn for a single crochet or half double crochet row and chain 2/3 for a double crochet row. Do the method that works best for you. If I write "dc 5" it means double crochet 5 stitches in the next 5 spaces. If I were to write 5dc it
means you make all those 5 dc in the same stitch. SHELL: 5 Double crochet in the same space Popcorn Stitch: in the space indicated you will make 5 dc. After you make all 5 remove your hook from the last dc and insert it in the first double crochet and back through the last double crochet and pull them together. *there are great online videos if you do not know how to make a popcorn stitch. It’s a fun stitch so it’s worth learning how to do and gives great texture) So, grab your two strands and your hook and begin: Chain 37 Row 1: Half double crochet (hdc) in second chain from the hook and in each chain to the end
(36) – this is the Right Side of your tree skirt (RS) Row 2: (Make 1 hdc in next 5 stitches, make 2 hdc in the next stitch) repeat across (42) Wrong Side (WS) Row 3: (Make 1 hdc in next 6 stitches, make 2 hdc in the next stitch) repeat across (48) (RS) Row 4: (Make 1 hdc in next 7 stitches, make 2 hdc in the next stitch) repeat across (54) (WS) Row 5: (Make 1 hdc in next 8 stitches, make 2 hdc in the next stitch) repeat across (60) (RS) Row 6: FRONT LOOP ONLY (FLO)(Make 1 hdc in next 9 stitches, make 2 hdc in the next stitch) repeat across (66) (WS) Row 7: (Make 1 DOUBLE CROCHET (dc) in next 10 stitches, make 2 DC in the next stitch)
repeat across (72) (RS) Row 8: (FLO) (Make 1 dc in next 11 stitches, make 2 dc in the next stitch) repeat across (78) (WS) Row 9: (Make 1 hdc in next 12 stitches, make 2 hdc in the next stitch) repeat across (84) (RS) Row 10: (Make 1 dc in next 13 stitches, make 2 dc in the next stitch) repeat across (90) (WS) Row 11: BLO (Make 1 dc in next 14 stitches, make 2 dc in the next stitch) repeat across (96) (RS) Row 12: (Make 1 hdc in next 15 stitches, make 2 hdc in the next stitch) repeat across (102) Row 13: BLO (Make 1 dc in next 16 stitches, make 2 dc in the next stitch) repeat across (108) *start some Shells on this next row
Row 14: dc, (skip 2 stitches, shell)* repeat across the row and dc at the end. (you will have 35 shells with a dc at each end and 177 stitches. This is the WS) Row 15: 2dc in 1st space between the dc and shell from the row below, chain 2, (shell in each space between the shells from the row below)* repeat across to the end, chain 2 and 2dc in the space between the shell and dc from the row below (you will have 35 shells, 4dc (2 on each end) and 179 stitches. This is the RS of your work) Row 16: dc across: put 1dc in each stitch and 2 dc in each chain 2 space (183 stitches) Row 17: BLO dc across (183) *this is a RS row
*start popcorn stitches on this row Row 18: dc in the first 3 stitches, (popcorn, dc 5)* repeat to the last 5 dc and dc 5. (30 popcorn stitches) (this is the WS of your work. After you make your popcorn stitches push them out to the other/right side of your work. Row 19: dc across the row (183) Row 20: (popcorn, dc 5)* repeat across until the last 3, popcorn, dc 2 (31 popcorns, push them through to the RS of your work if you need) Row 21: dc across the row (183) *make your last double crochet in the top of your turning chain from the row below and not in the popcorn. (RS) Row 22: dc across the row (183) (WS)
Row 23: dc across the row (183) (RS) Row 24: dc across the row (183) (WS) Row 25: hdc, (hdc 29, 2hdc) * (189 stitches) Row 26; BLO (hdc 30, 2hdc)* (195 stitches) (this is the Right Side of your work) ****note, you may decide to do less rows here at the end or even add some rows. If you add rows continue with the increase pattern…. (hdc 31, 2hdc), (hdc 32, 2hdc) etc. Continue if you like. You need to make sure; however, that you end with a RS row up for your final border round. Once I got to the end of Row 26, I turned to work down the side and make ties. I chose to make only 2 ties per side, but you can do 3 or 4 or even add
button holes on one side and buttons on the other. This part is up to you. The ties I made are a chain of 15 and then hdc back to the skirt. Evenly work down one side, across the back, up the other side and then when you get back to the front
of your tree skirt here is the end pattern:
(Sc in next stitch, chain 1)* – the little chain 1 just adds a nice little "bump" finish on the front. Weave in all tails. I suggest blocking this tree skirt in the method that you would normally block any afghan.
Pattern source: 12 Days Part 2.
This part finishes the set. If you want a bigger Grinch to sit under the tree with it, the stand-alone 26-inch pattern is here: 26-Inch Grinch Amigurumi with Santa Coat & Hat.