This is not an amigurumi in the usual sense. SAM is 18 by 35 cm, built on six metres of copper wire, and almost nothing about him is soft: the fins are rayed and wired, the jaw is hinged and framed, the teeth are separate pieces slipped onto a wire, and the lure ends in a housing that takes a real LED bulb. You crochet a fish skeleton and then crochet a fish over it.
The construction order matters more than any single round. The lower jaw and the muzzle are crocheted as two bowls, then folded into each other and joined stitch for stitch along the inner edge, which is what creates the mouth opening. The fins are made as separate tubes — the pattern calls them finger-rays — joined back and forth with single crochet into one flat webbed piece, and only then sewn to the body. Everything is joined before it is stuffed, and the wire goes in last.
Every round is written out below. Where the pattern says shift st, work one extra sc and move the marker, so the increases stay in a straight line down the back.

What you need
- Yarn: smooth, not stretchy — about 380 m per 100 g. 1.5 skeins of a multicolour and half a skein of a solid green
- Teeth and eyes: white mercerized cotton, 330 m per 50 g, on a 1.0 mm hook
- Bulb: yellow, silver grey and black cotton leftovers; a mini LED bulb on a keyring, or crochet the bulb from the pattern below
- Hook: 1.5 mm
- Structure: 1.0–1.5 mm copper wire, about 6 m; white fabric plaster or insulation tape; wire cutters; pliers
- Notions: polyester stuffing, 12 mm eyes or half beads, clear glue, beads for the fins, nylon thread and a needle
Abbreviations
MR magic ring, sc single crochet, inc two sc in one stitch, dec two sc together, blo back loops only, ss slip stitch, shift st one extra sc then move the marker. US terms. Decreases are worked as real decreases, not by skipping a stitch.
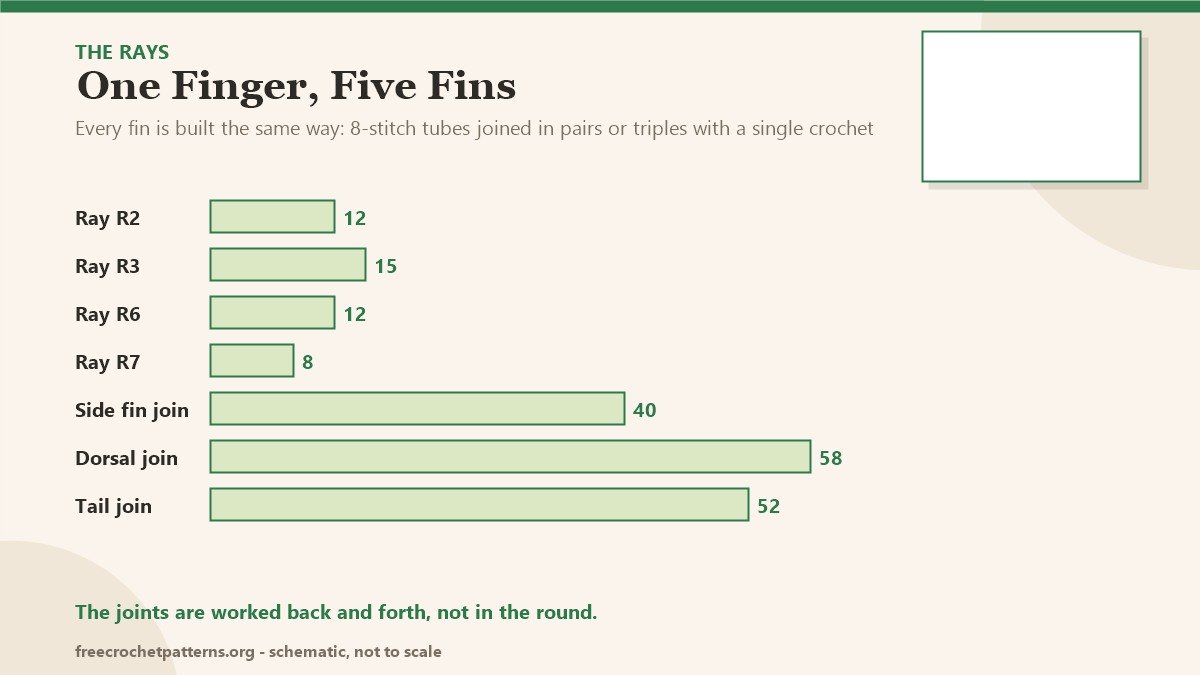
The finger-rays
Every fin is made of these. Work the base once for each ray:
- R1: 6 sc in MR (6)
- R2: 2 sc in each st (12)
- R3: (3 sc, inc) ×3 (15)
- R4–5: 15 sc — 2 rounds
- R6: (3 sc, dec) ×3 (12)
- R7: (sc, dec) ×4 (8)
Then, depending on the fin:
- Side fin, ray A and ray B: R8–10: 8 sc. Ray B only, then R11: inc, 2 sc, (inc) ×2, 2 sc, inc (12). Fasten off.
- Lower fin, ray A: R8–9: 8 sc. Ray B: R8–9: 8 sc, then R10: inc, 2 sc, (inc) ×2, 2 sc, inc (12). Fasten off.
- Dorsal, ray A: R8–12: 8 sc, then R17: inc, 2 sc, (inc) ×2, 2 sc, inc (12). Ray B: R8–16: 8 sc, then R17 (12). Ray C: R8–15: 8 sc, then R16 (12). Ray D: R8–13: 8 sc, then R14 (12). Ray E: R8–12: 8 sc. Fasten off.
- Tail, ray A: R8–11: 8 sc. Ray B: R8–11: 8 sc, fasten off. Ray C: R8–12: 8 sc, then R13 (12). Fasten off.
When you join two rays, do not make the increase the diagram shows at the junction — it exists only to tell you where the rays meet.
Joining without holes. Draw a loop through the same place you just worked, but do not finish it: two loops on the hook. Draw another loop through the matching stitch of the previous round on the other ray: three loops. Pull through all three. It is an increase and a decrease at once, and it closes the gap between the rays.
The side fins (make 2)
Two rays each, A and B. Worked back and forth from the join.
- R1: 4 sc around A, 6 sc around B, 6 sc around B, 8 sc around A; turn; 6 sc around B, 6 sc around B, 4 sc around A (40)
- R2: dec, 16 sc, (dec) ×2, 16 sc, dec (36) + shift st
- R3: (16 sc, dec) ×2 (34)
- R4: (15 sc, dec) ×2 (32) + shift st
- R5: (14 sc, dec) ×2 (30)
- R6: (13 sc, dec) ×2 (28) + shift st
- R7: (12 sc, dec) ×2 (26)
- R8: (11 sc, dec) ×2 (24) + shift st
- R9: (10 sc, dec) ×2 (22) — change to the multicolour here
- R10: (9 sc, dec) ×2 (20) + shift st
- R11–13: 20 sc — 3 rounds + shift st
- R14: (9 sc, inc) ×2 (22)
- R15: (10 sc, inc) ×2 (24)
Stuff the rays lightly; do not stuff the web of the fin.
The lower fin
Rays A (2 of them) and B (1), joined the same way.
- R1: 4 sc around A, 6 sc around B, 8 sc around A; turn; 6 sc around B, 4 sc around A (28)
- R2: (inc, 13 sc) ×2 (30) + shift st
- R3: (inc, 14 sc) ×2 (32)
- R4: (inc, 15 sc) ×2 (34)
No wire in this one.
The dorsal fin
Five rays: A, B, C, C, D, E.
- R1: 4 sc around A, 6 sc around B, 6 sc around C, 6 sc around C, 5 sc, (inc) ×2, 5 sc around D; turn; 6 sc around C, 6 sc around C, 6 sc around B, 4 sc around A (58)
- R2: inc, 28 sc, 5 sc, (inc) ×2, 5 sc around D; turn; 29 sc (73) + shift st
- R3: inc, 36 sc, 5 sc, (inc) ×2, 5 sc around D; turn; 36 sc (88)
- R4: inc, 43 sc, 3 sc, inc, 4 sc around E; turn; 44 sc (98)
- R5: (inc, 48 sc) ×2 (100) + shift st
- R6: (inc, 49 sc) ×2 (102) + shift st
- R7: (inc, 50 sc) ×2 (104)
It will twist while you work. It stops twisting once the wire is in.
The tail
Rays A, B, B, B, B and C. The last two B rays are set aside and sewn on at the very end.
- R1: 4 sc around A, 6 sc around C, 3 sc, inc, 4 sc around B; turn; 6 sc around C, 3 sc, inc around A (30)
- R2: (14 sc, inc) ×2 (32)
- R3: (15 sc, inc) ×2 (34)
- R4: 4 sc around A, 17 sc, 3 sc, inc, 4 sc around B; turn; 17 sc, 3 sc, inc around A (52)
- R5–11: 52 sc — 7 rounds
Insert 1 m of wire in the two halves, the ends coming out evenly between R8 and R9, and wrap the ends with plaster.
- R12: (dec, 22 sc, dec) ×2 (48)
- R13: (dec, 20 sc, dec) ×2 (44)
- R14: (dec, 18 sc, dec) ×2 (40)
- R15: (dec, 16 sc, dec) ×2 (36)
- R16: (dec, 14 sc, dec) ×2 (32)
Stuff the rays and the tail.
The lower jaw
The marker runs along the side edge; leave it there.
- R1: 6 sc in MR (6)
- R2: 2 sc in each st (12)
- R3: (sc, inc) ×6 (18)
- R4: sc, inc, (2 sc, inc) ×5, sc (24)
- R5: (3 sc, inc) ×6 (30)
- R6: 2 sc, inc, (4 sc, inc) ×5, 2 sc (36)
- R7: (5 sc, inc) ×6 (42)
- R8: 3 sc, inc, (6 sc, inc) ×5, 3 sc (48)
- R9: (7 sc, inc) ×6 (54)
- R10: 4 sc, inc, (8 sc, inc) ×5, 4 sc (60)
- R11: (9 sc, inc) ×6 (66)
- R12: 5 sc, inc, (10 sc, inc) ×5, 5 sc (72)
- R13: (11 sc, inc) ×6 (78)
- R14: 6 sc, inc, (12 sc, inc) ×5, 6 sc (84)
- R15: (13 sc, inc) ×6 (90)
- R16: 90 sc
- R17: 7 sc, inc, (14 sc, inc) ×5, 7 sc (96)
- R18: 96 sc
- R19: (15 sc, inc) ×6 (102)
- R20: 102 sc
- R21: 8 sc, inc, (16 sc, inc) ×5, 8 sc (108)
- R22: 108 sc
- R23: (35 sc, inc) ×3 (111)
- R24: 111 sc
- R25: 18 sc, inc, (36 sc, inc) ×2, 18 sc (114)
- R26: 114 sc
- R27: (37 sc, inc) ×3 (117)
- R28: 117 sc
- R29: 19 sc, inc, (38 sc, inc) ×2, 19 sc (120)
- R30: 120 sc
- R31: (39 sc, inc) ×3 (123)
- R32: 123 sc
- R33: 20 sc, inc, (40 sc, inc) ×2, 20 sc (126)
- R34–35: 126 sc — 2 rounds
- R36: (41 sc, inc) ×3 (129)
- R37: 129 sc
- R38: 21 sc, inc, (42 sc, inc) ×2, 21 sc (132)
- R39: ((inc) ×2, 64 sc) ×2 (136)
- R40: sc, (inc) ×2, 66 sc, (inc) ×2, 65 sc (140)
- R41: 2 sc, (inc) ×2, 68 sc, (inc) ×2, 66 sc (144)
- R42: 3 sc, (inc) ×2, 70 sc, (inc) ×2, 67 sc (148), ss. Fasten off.
The muzzle
- R1: 7 sc in MR (7)
- R2: 2 sc in each st (14)
- R3: (sc, inc) ×7 (21)
- R4: sc, inc, (2 sc, inc) ×6, sc (28)
- R5: (3 sc, inc) ×7 (35)
- R6: 2 sc, inc, (4 sc, inc) ×6, 2 sc (42)
- R7: 3 sc, inc, (6 sc, inc) ×5, 3 sc (48)
- R8: (7 sc, inc) ×6 (54)
- R9: 4 sc, inc, (8 sc, inc) ×5, 4 sc (60)
- R10: (9 sc, inc) ×6 (66)
- R11: 5 sc, inc, (10 sc, inc) ×5, 5 sc (72)
- R12: (11 sc, inc) ×6 (78)
- R13: 6 sc, inc, (12 sc, inc) ×5, 6 sc (84)
- R14: 84 sc
- R15: (13 sc, inc) ×6 (90)
- R16: 90 sc
- R17: 7 sc, inc, (14 sc, inc) ×5, 7 sc (96)
- R18: 96 sc
- R19: (15 sc, inc) ×6 (102)
- R20: 102 sc
- R21: 8 sc, inc, (16 sc, inc) ×5, 8 sc (108)
- R22: 108 sc
- R23: (17 sc, inc) ×6 (114)
- R24: 114 sc
- R25: 9 sc, inc, (18 sc, inc) ×5, 9 sc (120)
- R26: 120 sc
- R27: (39 sc, inc) ×3 (123)
- R28: 123 sc
- R29: 20 sc, inc, (40 sc, inc) ×2, 20 sc (126)
- R30: 126 sc
- R31: (41 sc, inc) ×3 (129)
- R32–37: 129 sc — 6 rounds. Do not cut the yarn.
Joining the jaw to the muzzle
Fold the jaw so the increases sit in opposite corners. The jaw then has 72 stitches on the inner edge and 76 on the outer, 148 in total. Turn the muzzle so its marker is at the centre back: 57 stitches at the back, 72 that will be hidden under the jaw.
Put the two pieces right sides facing and join the inner edge of the jaw to those 72 muzzle stitches, hook going in from the inside of the jaw.
- R1: 28 sc around the muzzle, join the 29th muzzle stitch to the jaw between its 1st and 2nd stitches, 72 sc through both pieces, 29 sc back to the marker (129)
- R2: 28 sc from the marker, join at the jaw, 76 sc around the outer edge of the jaw, 29 sc to the marker (133)
From here you work the outer contour only: muzzle plus the outside of the jaw.
- R3: inc, 132 sc (134)
- R4: 134 sc
- R5: inc, 133 sc (135)
- R6–10: 135 sc — 5 rounds
- R11: dec, 133 sc (134)
- R12: (dec, 65 sc) ×2 (132)
- R13: 32 sc, dec, 64 sc, dec, 32 sc (130)
- R14: 16 sc, dec, 94 sc, dec, 16 sc (128)
- R15: (dec, 62 sc) ×2 (126)
- R16: 31 sc, dec, 61 sc, dec, 30 sc (124)
- R17: 15 sc, dec, 90 sc, dec, 15 sc (122)
- R18: dec, 120 sc (121)
- R19: 29 sc, dec, 59 sc, dec, 29 sc (119)
- R20: 15 sc, dec, 85 sc, dec, 15 sc (117)
- R21: dec, 115 sc (116)
- R22: 28 sc, dec, 56 sc, dec, 28 sc (114)
- R23: 15 sc, dec, 80 sc, dec, 15 sc (112)
- R24: dec, 110 sc (111)
- R25: 27 sc, dec, 53 sc, dec, 27 sc (109)
- R26: 14 sc, dec, 77 sc, dec, 14 sc (107)
- R27: dec, 105 sc (106)
- R28: 26 sc, dec, 50 sc, dec, 26 sc (104)
- R29: 13 sc, dec, 74 sc, dec, 13 sc (102)
Reinforce the jaw now. Cut a piece of wire as long as the outer contour of the jaw plus 1 cm at each end, make a small loop at each end with pliers, and pin it in place.
- R30: 16 sc, dec, (32 sc, dec) ×2, 16 sc (99)
- R31: (31 sc, dec) ×3 (96)
- R32: 15 sc, dec, (30 sc, dec) ×2, 15 sc (93)
- R33: (29 sc, dec) ×3 (90)
- R34: 14 sc, dec, (28 sc, dec) ×2, 14 sc (87)
- R35: (27 sc, dec) ×3 (84)
- R36: 13 sc, dec, (26 sc, dec) ×2, 13 sc (81)
- R37: (25 sc, dec) ×3 (78)
- R38: 12 sc, dec, (24 sc, dec) ×2, 12 sc (75)
- R39: (23 sc, dec) ×3 (72)
- R40: 11 sc, dec, (22 sc, dec) ×2, 11 sc (69)
- R41: (21 sc, dec) ×3 (66)
- R42: (20 sc, dec) ×3 (63)
- R43: (19 sc, dec) ×3 (60)
- R44: (18 sc, dec) ×3 (57)
- R45: (17 sc, dec) ×3 (54)
- R46: (16 sc, dec) ×3 (51)
- R47: (15 sc, dec) ×3 (48)
- R48: (22 sc, dec) ×2 (46)
- R49: (21 sc, dec) ×2 (44)
- R50: (20 sc, dec) ×2 (42)
Mark the points for the fins: 42 stitches either side of the centre marker between R1 and R2, and 38 stitches either side between R8 and R9.
- R51: (dec, 17 sc, dec) ×2 (38)
- R52: (dec, 15 sc, dec) ×2 (34)
- R53: (dec, 13 sc, dec) ×2 (30)
- R54: (13 sc, dec) ×2 (28)
- R55: 28 sc
- R56: (inc, 12 sc, inc) ×2 (32)
Fasten off. Stuff the fish, lightly in the muzzle and not at all in the lower jaw — the muzzle has to stay tucked under the jaw.

The teeth
Worked on a 1.0 mm hook in white or grey cotton. Make as many as you like; the original uses two of A, two of B, two of C and eight or ten of D.
- A: 6 sc in MR, R2–5: 6 sc, then R5–10: 9 sc. Fasten off. (Short tooth, long root.)
- B: 6 sc in MR, R2–3: 6 sc, R4: (sc, inc) ×3 (9), R5–8: 9 sc. Fasten off.
- C: 6 sc in MR, R2–3: 6 sc, R4: (sc, inc) ×3 (9), R5–6: 9 sc. Fasten off.
- D: 6 sc in MR, R2–4: 6 sc. Fasten off.
For the frame: bend a piece of wire the size of the tooth, slide the tooth on, and take the two ends out of the jaw 5 or 6 stitches apart. Bend the long end at 90 degrees where it comes out, try the next tooth, cut a piece of wire to its length, wrap with plaster and insert the bent end back into the jaw 5 stitches further on. Wrap the projecting end too.
The fishing line and the bulb housing
- R1: 6 sc in MR (6)
- R2–56: 6 sc — 55 rounds
- R57: (sc, inc) ×3 (9)
- R58: 9 sc
- R59: (2 sc, inc) ×3 (12)
- R60: 12 sc
- R61: (3 sc, inc) ×3 (15)
- R62: 15 sc
- R63: (4 sc, inc) ×3 (18)
- R64: 18 sc. Fasten off.
Try the line on the wire. If the two wire ends come out level, cut 2 cm off one, bend it back alongside the other and wrap both together with plaster.
Wiring the fish
- Insert the side-fin frames into the marked points, sew the fins on, then join all four wire pieces and wrap them.
- Bend two ends of the wire in opposite directions, fix with plaster, and bring them out two rounds from the centre marker in the first round after the jaw join — that is the fishing line’s support.
- For the dorsal fin, make one U-shaped piece for A and B, then a second for B and C joined to the first, and so on; small loops at every end, all wrapped.
- Mark the lower fin between R40 and R41 of the belly, count 5 rounds each way, and build its frame like the dorsal.
- Join body and tail by taking the body’s wire ends out where the tail wire goes, then sew the last two B rays on with their own inner frame.
The eyes
Eye whites (make 2, 1.0 mm hook, white)
- R1: 6 sc in MR (6)
- R2: inc in each st (12)
- R3: (sc, inc) ×6 (18)
- R4: sc, inc, (2 sc, inc) ×5, sc (24)
- R5: (7 sc, inc) ×3 (27)
- R6: 4 sc, inc, (8 sc, inc) ×2, 4 sc (30)
- R7: (14 sc, inc) ×2 (32)
- R8–15: 32 sc — 8 rounds
- R16: (14 sc, dec) ×2 (30)
- R17: 4 sc, dec, (8 sc, dec) ×2, 4 sc (27)
- R18: (7 sc, dec) ×3 (24)
- R19: sc, dec, (2 sc, dec) ×5, sc (18)
- R20: (sc, dec) ×6 (12)
- R21: (dec) ×6 (6)
Stuff lightly, close, and work a stitch from the top of the eye to the bottom to form the socket.
Eyelids (make 2, 1.5 mm hook)
- R1: ch 4, inc in the 2nd chain, sc, 4 sc in the last chain; turn; sc along the other side, 2 sc in the last chain (10)
- R2: (inc, 3 sc, inc) ×2 (14)
- R3: (inc, 5 sc, inc) ×2 (18) + shift st
- R4: (inc, 7 sc, inc) ×2 (22)
- R5: 10 sc, (inc) ×2, 10 sc (24)
- R6: dec, 9 sc, (inc) ×2, 9 sc, dec (24), ss
Insert the whites into the eyelids and sew them together. Pin them on the muzzle to mark the contour, then mirror it on the other side with a temporary marker at the centre.
The bulb, if you crochet it
1.0 mm hook, yellow first.
- R1: 6 sc in MR (6)
- R2: inc in each st (12)
- R3: sc, inc, 2 sc, inc, sc, inc, 2 sc, inc, sc, inc (17)
- R4: 2 sc, inc, 2 sc, inc, sc, inc, 2 sc, inc, 2 sc, inc, sc, inc, sc (23)
- R5: 3 sc, inc, 5 sc, inc, 5 sc, inc, 5 sc, inc, sc (27)
- R6: 4 sc, inc, 6 sc, inc, 6 sc, inc, 6 sc, inc, sc (31)
- R7: 8 sc, inc, 9 sc, inc, 9 sc, inc, 2 sc (34)
- R8: 10 sc, inc, 16 sc, inc, 6 sc (36)
- R9: 17 sc, inc, 18 sc (37)
- R10: 37 sc
- R11: 17 sc, dec, 18 sc (36)
- R12: 6 sc, dec, 16 sc, dec, 10 sc (34)
- R13: 2 sc, dec, 9 sc, dec, 9 sc, dec, 8 sc (31)
- R14: sc, dec, 6 sc, dec, 6 sc, dec, 6 sc, dec, 4 sc (27)
- R15: sc, dec, 5 sc, dec, 5 sc, dec, 5 sc, dec, 3 sc (23)
- R16: sc, dec, sc, dec, 2 sc, dec, 2 sc, dec, sc, dec, 2 sc, dec, 2 sc (17)
- R17–19: 17 sc — 3 rounds
Change to silver grey.
- R20: 17 sc
- R21–24: 17 sc blo — 4 rounds, this is the screw base
- R25: (dec) ×9 (8)
Change to black, work R26: 8 sc with no decreases, fasten off leaving a long tail and close the hole. Join the bulb to the end of the fishing line.
Beads
With nylon thread, come out at R4 of a finger, thread one large bead and one small one, go back through the large bead and into the finger to make a knob, then come out beside it and add pairs of small beads around the large one, spacing them by eye. Finish each round by pulling the thread so the circle evens out, then work lines instead of circles. Mark the pattern with pins so both sides match.

Notes
Do not skip the plaster on the wire ends. This fish has more wire than stuffing, and there are six places where an untaped end can work its way out through a stitch — the jaw frame, the two side fins, the dorsal, the lower fin and the tail.
The teeth are removable: they slide on the frame, so you can change the arrangement, or take them out for a child.
If you want the lure only, the fishing line plus bulb makes a 10 cm charm on its own.
More unusual makes: Amanita Mushroom House is the other wired, structured piece, Three Little Kittens is the soft one, and Two-in-One Frog is the one that turns inside out. Everything is on the patterns page.
Pattern source: Anglerfish SAM.