
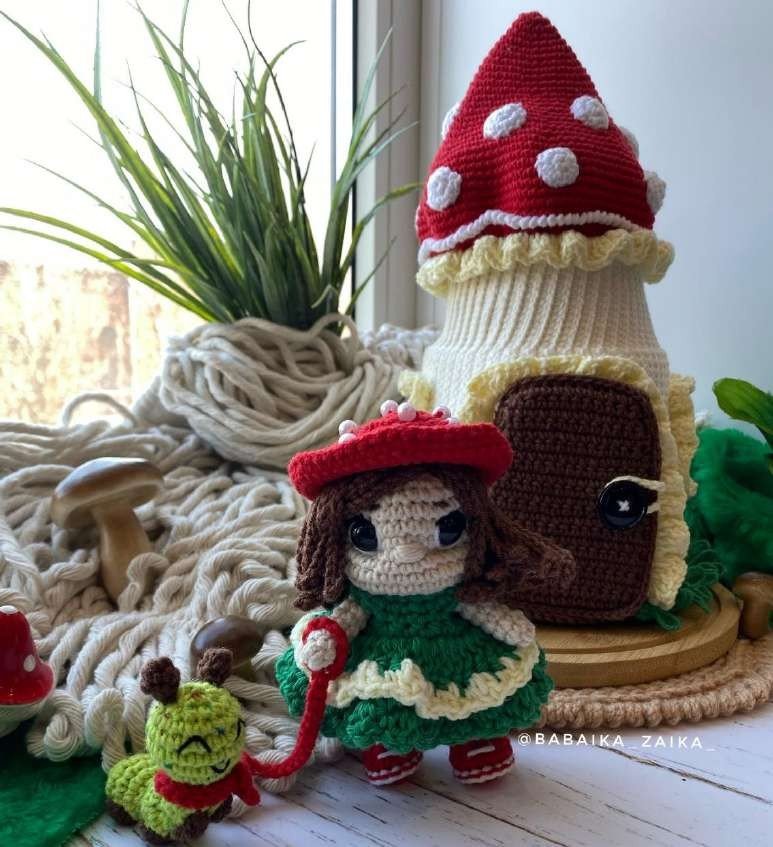
A red-capped mushroom 27 cm tall, a door in the stem, and a doll and a caterpillar small enough to live inside it. The house is not stuffed — it is built: two flat crocheted walls, a cardboard and plastic sandwich, a crocheted floor and a lift-off cap. That is why it stands up straight instead of sagging, and why the windows are real openings you can see through.
The construction is unusual enough to be worth spelling out. Each wall is a flat rectangle, 97 rows of 40 stitches, with the window and door openings made by chaining over skipped stitches rather than by cutting. The two walls (one white, one lemon) are then joined along the outside edge with the plastic sheet between them, folded into a tube, and closed down the back. The floor is two brown discs of 17 rounds with a cardboard circle between them, joined to the walls with 86 stitches. The cap is a plain 96-stitch dome, sewn on at the top.
Inside live a 12 cm doll — white body, milky face, red boots, green dress, brown ringlets — and a 6 cm caterpillar worked on a bent wire so it can curl. All three are written out below, every row and every round.
What you need
- Yarn: sport weight cotton, 100 g / 330 m — brown, white, red, green and lemon for the house; the same plus milky for the doll; light green tweed and brown for the caterpillar
- Hook: 1.75 mm, worked tightly
- Structure: thick cardboard, plastic sheet (a document folder works), adhesive tape, one 2–2.5 mm wire 5 cm long
- Notions: fibre fill, 12 mm safety eyes for the doll, beads, one button for the door and one for the dress, black embroidery thread, sewing needle, pins
The house comes out at 27 cm tall and 15 cm wide; the doll at 12 cm; the caterpillar at 6 cm.
Abbreviations
MR magic ring, sc single crochet, dc double crochet, inc increase, dc-inc two dc in one stitch, dec decrease, slst slip stitch, ch chain, FLO front loops only, BLO back loops only, bobble four dc in one stitch with a common top. US terms.
The walls (make 2 — one white, one lemon)
Worked in rows, turning at the end of each. The 15 slip stitches at the end of every other row keep one edge straight; that edge becomes the back of the house.
- R1: ch 41, from the second chain 40 sc, turn (40)
- R2, R4, R6 … R18 — 9 rows: ch1, 25 sc, 15 slst, turn (40)
- R3, R5, R7 … R19 — 9 rows: ch1, 40 sc, turn (40)
First window. Before skipping, ch1 and push the hook through the loop to make a knot, so the skipped stitches cannot unravel. Fix all the tails at the end.
- R20: ch1, 10 sc, skip 10, 5 sc, 15 slst, turn
- R21: ch1, 20 sc, skip 10, 10 sc, turn
- R22: ch1, 10 sc, skip 10, 5 sc, 15 slst, turn
- R23: ch1, 20 sc, skip 10, 10 sc, turn
- R24: ch1, 10 sc, skip 10, 5 sc, 15 slst, turn
- R25: ch1, 20 sc, skip 10, 10 sc, turn
- R26: ch1, 10 sc, skip 10, 5 sc, 15 slst, turn
- R27: ch1, 20 sc, skip 10, 10 sc, turn
- R28: ch1, 10 sc, skip 10, 5 sc, 15 slst, turn
- R29: ch1, 20 sc, skip 10, 10 sc, turn
- R30: ch1, 10 sc, ch 10, 5 sc, 15 slst, turn (40)
- R31: ch1, 20 sc, 10 sc into the chain, 10 sc, turn (40)
- R32, R34, R36 … R44 — 7 rows: ch1, 25 sc, 15 slst, turn (40)
- R33, R35, R37 … R43 — 6 rows: ch1, 40 sc, turn (40)
The doorway. Same knot trick at the start of R45.
- R45: ch1, 20 sc, turn (20)
- R46: ch1, 5 sc, 15 slst, turn (20)
- R47: ch1, 20 sc, turn
- R48: ch1, 5 sc, 15 slst, turn
- R49: ch1, 20 sc, turn
- R50: ch1, 5 sc, 15 slst, turn
- R51: ch1, 20 sc, turn
- R52: ch1, 5 sc, 15 slst, turn
- R53: ch1, 20 sc, turn
- R54: ch1, 5 sc, 15 slst, turn
- R55: ch1, 20 sc, turn
- R56: ch1, 5 sc, 15 slst, turn
- R57: ch1, 20 sc, ch 21 (40)
- R58: from the second chain on the hook, 25 sc, 15 slst, turn (40)
- R59, R61, R63 … R69 — 6 rows: ch1, 40 sc, turn (40)
- R60, R62, R64 … R70 — 6 rows: ch1, 25 sc, 15 slst, turn (40)
Second window.
- R71: ch1, 20 sc, skip 10, 10 sc, turn
- R72: ch1, 10 sc, skip 10, 5 sc, 15 slst, turn
- R73: ch1, 20 sc, skip 10, 10 sc, turn
- R74: ch1, 10 sc, skip 10, 5 sc, 15 slst, turn
- R75: ch1, 20 sc, skip 10, 10 sc, turn
- R76: ch1, 10 sc, skip 10, 5 sc, 15 slst, turn
- R77: ch1, 20 sc, skip 10, 10 sc, turn
- R78: ch1, 10 sc, skip 10, 5 sc, 15 slst, turn
- R79: ch1, 20 sc, skip 10, 10 sc, turn
- R80: ch1, 10 sc, skip 10, 5 sc, 15 slst, turn
- R81: ch1, 20 sc, ch 10, 10 sc, turn
- R82: ch1, 10 sc, 10 sc into the chain, 5 sc, 15 slst, turn (40)
- R83: ch1, 40 sc, turn (40)
- R84, R86, R88 … R96 — 7 rows: ch1, 25 sc, 15 slst, turn (40)
- R85, R87, R89 … R95 — 6 rows: ch1, 40 sc, turn (40)
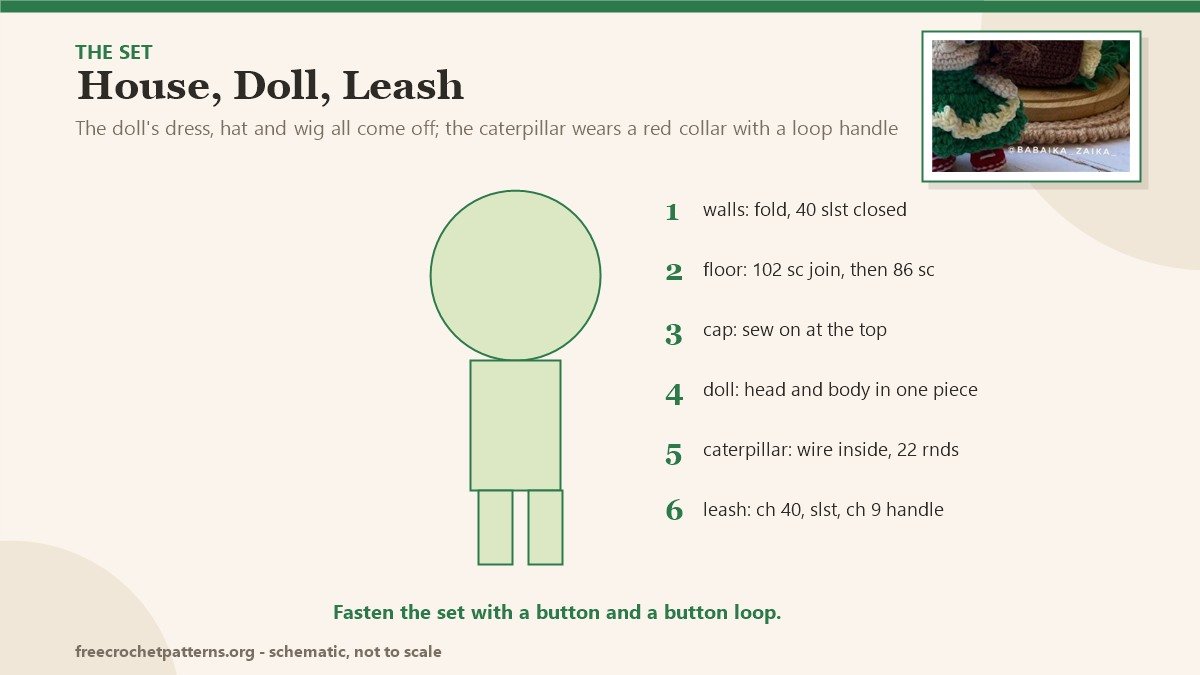
- R97: ch1, 40 sc, then fold the piece in half and work 40 slst through both sides to close the top edge
Connecting the walls
- Cut the threads across the window openings and fix them on the inside.
- Cut a rectangle of plastic to the size of the finished wall. Lay the lemon wall inside the white one, wrong sides facing, and pin.
- Attach white yarn at the corner of the door and work 85 sc around the outside contour, slipping the plastic between the two walls as you go. Do not cut the yarn.
- Work 58 sc around the doorway, then fasten off.
- Cut the window holes out of the plastic, then work 44 sc around each window opening, catching both walls.
- Close the top: attach white yarn and work 84 sc along the upper edge. Fasten off.
The floor (make 2, brown)
- R1: 6 sc in MR (6)
- R2: 6 inc (12)
- R3: (sc, inc) ×6 (18)
- R4: (2 sc, inc) ×6 (24)
- R5: (3 sc, inc) ×6 (30)
- R6: (4 sc, inc) ×6 (36)
- R7: (5 sc, inc) ×6 (42)
- R8: (6 sc, inc) ×6 (48)
- R9: (7 sc, inc) ×6 (54)
- R10: (8 sc, inc) ×6 (60)
- R11: (9 sc, inc) ×6 (66)
- R12: (10 sc, inc) ×6 (72)
- R13: (11 sc, inc) ×6 (78)
- R14: (12 sc, inc) ×6 (84)
- R15: (13 sc, inc) ×6 (90)
- R16: (14 sc, inc) ×6 (96)
- R17: (15 sc, inc) ×6 (102)
Cut a cardboard circle and sandwich it between the two discs. With brown yarn, work 102 sc around the edge through both pieces. Do not cut the yarn.
Join the floor to the walls
- Attach the floor to the bottom of the walls and work through both, starting at the beginning of the door: ch1, 86 sc through both thicknesses, then 15 sc along the free edge of the floor without turning.
- Change to green and work 86 loop stitches — a round of crab stitch or reverse sc along the join reads as grass. Fasten off.
Decoration
- Frills at the top: attach lemon yarn at the top edge of the house and work ch2, 86 dc-inc, slst (172).
- Window frames: with lemon yarn, 44 slst around the window opening, turn; ch2, 44 dc-inc, slst (88).
- Doorjamb: about 4 mm out from the door, with lemon yarn, 58 slst around, turn; ch1, 58 dc-inc (116).
- Window bars: with brown thread, make three or four long stitches across each window and wind them into rococo stitches so they read as a window frame.
The door (make 2, brown)
Worked in rows.
- R1: ch 17, from the second chain 16 sc, turn (16)
- R2–15: ch1, 16 sc, turn — 14 rows
- R16: ch1, dec, 12 sc, dec, turn (14)
- R17–18: ch1, 14 sc, turn — 2 rows
- R19: ch1, dec, 10 sc, dec, turn (12)
- R20–21: ch1, 12 sc, turn — 2 rows
Cut a cardboard rectangle and put it between the two door pieces. With brown yarn work around the edge through both: 20 sc, inc in the corner, 14 sc, inc in the corner, 32 sc, inc in the corner, 26 sc, inc in the corner, 10 sc, inc in the corner, 28 sc. Fasten off. Sew the door to the inside of the wall on one side only, so it swings open.
The cap (red)
- R1: 6 sc in MR (6)
- R2: 6 inc (12)
- R3: 12 sc
- R4: (sc, inc) ×6 (18)
- R5: 18 sc
- R6: (2 sc, inc) ×6 (24)
- R7: 24 sc
- R8: (3 sc, inc) ×6 (30)
- R9: 30 sc
- R10: (4 sc, inc) ×6 (36)
- R11: 36 sc
- R12: (5 sc, inc) ×6 (42)
- R13: 42 sc
- R14: (6 sc, inc) ×6 (48)
- R15: (7 sc, inc) ×6 (54)
- R16: 54 sc
- R17: (8 sc, inc) ×6 (60)
- R18: (9 sc, inc) ×6 (66)
- R19: 66 sc
- R20: (10 sc, inc) ×6 (72)
- R21: (11 sc, inc) ×6 (78)
- R22: 78 sc
- R23: (12 sc, inc) ×6 (84)
- R24: (13 sc, inc) ×6 (90)
- R25: 90 sc
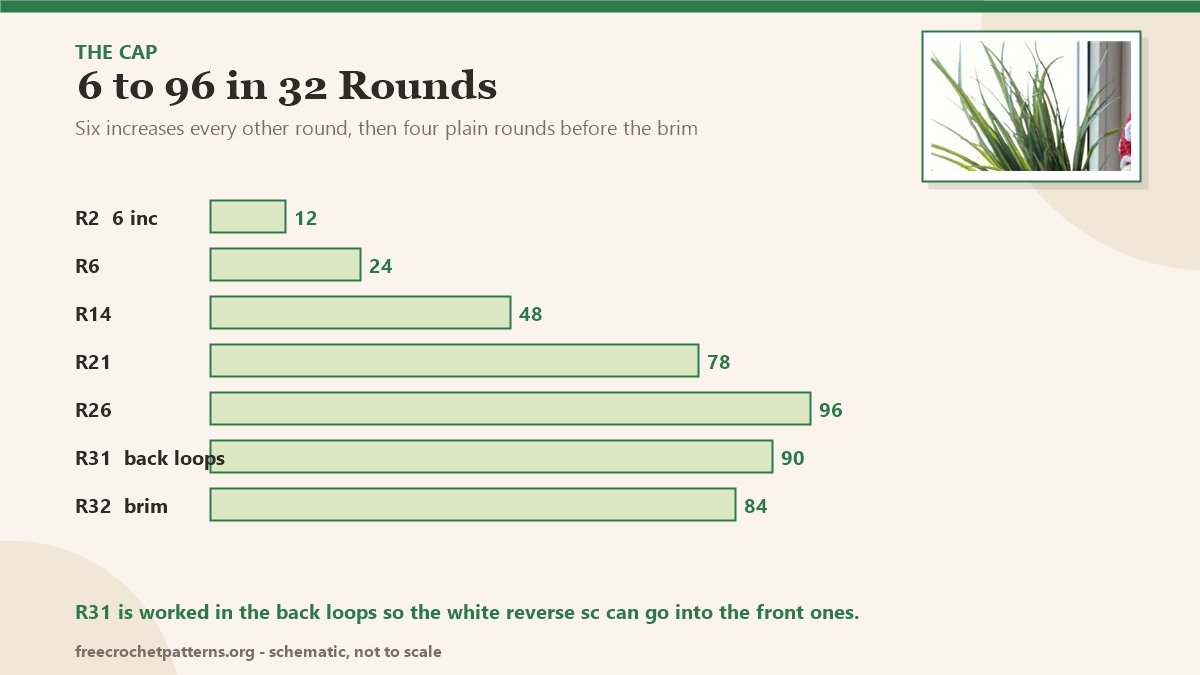
- R26: (14 sc, inc) ×6 (96)
- R27–30: 96 sc — 4 rounds
- R31: BLO (14 sc, dec) ×6 (90)
- R32: (13 sc, dec) ×6 (84)
Leave a long tail and sew the cap to the top of the house.
Spots (make 12, white)
- R1: 6 sc in MR (6)
- R2: 6 inc (12)
Pin them on the cap in a checkerboard, six in the first row and three each in the next two, then sew them down. Go back to R31 of the cap and, working with white yarn into the front loops, work 96 reverse sc along the brim.
Sew a button to the door as a handle, and make a button loop on the opposite side of the wall.
The doll
Arms (make 2, milky)
- R1: 6 sc in MR (6)
- R2–6: 6 sc — 5 rounds
Stuff, fasten off.
Legs (make 2, start in red)
- R1: ch 6, from the second chain: inc, 3 sc, 3 sc in the last chain, 4 sc (12)
- R2: 2 inc, 3 sc, 3 inc, 3 sc, inc (18)
- R3: BLO 18 sc
- R4: 4 sc, 6 dec, 2 sc (12)
- R5: 4 sc, 3 dec, 2 sc (9)
Change to milky at the end of R5.
- R6: (sc, dec) ×3 (6)
- R7–12: 6 sc — 6 rounds
Stuff. Go back to R3 and work 18 slst in white through the front loops — that is the boot cuff. Embroider the laces in white.
Body and head (one piece)
Body, in white:
- R1: 6 sc in MR (6)
- R2: 6 inc (12)
- R3: (sc, inc) ×6 (18)
- R4: (2 sc, inc) ×6 (24)
- R5–7: 24 sc — 3 rounds
Change to milky at the end of R7.
- R8: BLO 24 sc
- R9: 24 sc
- R10: (2 sc, dec) ×6 (18)
- R11: 18 sc
- R12: (sc, dec) ×6 (12)
- R13: 12 sc
Stuff the body. Head, continuing on the same 12 stitches:
- R14: 12 inc (24)
- R15: (3 sc, inc) ×6 (30)
- R16–22: 30 sc — 7 rounds
Insert the eyes between R20 and R21, 8 to 10 stitches apart, and stuff the head firmly.
- R23: (3 sc, dec) ×6 (24)
- R24: (2 sc, dec) ×6 (18)
- R25: (sc, dec) ×6 (12)
- R26: 6 dec (6)
Wig (brown)
- R1: 6 sc in MR (6)
- R2: 6 inc (12)
- R3: (sc, inc) ×6 (18)
- R4: (2 sc, inc) ×6 (24)
- R5: (3 sc, inc) ×6 (30)
- R6–8: 30 sc — 3 rounds
- R9: the curls — slst, then (ch 13, from the second chain 12 slst, slst into the base) ×30
Leave a long tail and sew the wig on. Make a parting at the front and pin the strands before sewing.
Hat (red)
- R1: 6 sc in MR (6)
- R2: 6 inc (12)
- R3: (sc, inc) ×6 (18)
- R4: (2 sc, inc) ×6 (24)
- R5: (3 sc, inc) ×6 (30)
- R6: (4 sc, inc) ×6 (36)
- R7–9: 36 sc — 3 rounds
- R10: (5 sc, inc) ×6 (42)
- R11: (6 sc, inc) ×6 (48)
- R12: (7 sc, inc) ×6 (54)
- R13: 54 sc
- R14: 54 slst
Sew beads on the hat in a checkerboard.
Dress (green, worked in rows)
- R1: ch 19, from the second chain 18 sc, turn (18)
- R2: ch1, 3 sc, ch 4, skip 4 sc, 4 sc, ch 4, skip 4 sc, 3 sc, turn (18)
- R3: ch1, (sc, inc) ×9, turn (27)
- R4: ch2, (dc, dc-inc) ×13, dc, turn (40)
- R5: BLO ch2, 40 dc, turn (40)
- R6: ch2, (dc-inc, sc) ×20
Go back to R5 and, with lemon yarn into the front loops, work ch2, (dc-inc, sc) ×20 for the hem. Sew a button and a button loop at the back, then dress the doll.

The caterpillar
The body is worked with two colours — the brown segments are the little legs, changed in the middle of a round in jacquard style. With light green:
- R1: 6 sc in MR (6)
- R2: 6 inc (12)
- R3: 12 sc
- R4: sc, bobble in brown, 2 sc, bobble in brown, 7 sc (12)
- R5: 12 sc
- R6: 6 dec (6)
- R7: 6 inc (12)
- R8: 2 sc, bobble in brown, 2 sc, bobble in brown, 6 sc (12)
- R9: 12 sc
- R10: 6 dec (6)
- R11: 6 inc (12)
- R12: 3 sc, bobble in brown, 2 sc, bobble in brown, 5 sc (12)
- R13: 12 sc
- R14: 6 dec (6)
- R15: 6 inc (12)
- R16: (sc, inc) ×6 (18)
- R17–20: 18 sc — 4 rounds
Bend the 5 cm wire, wrap it in tape, and slide it inside before you close the head. Stuff with fibre fill as you go.
- R21: (sc, dec) ×6 (12)
- R22: 6 dec (6)
Antennae (make 2, brown)
- R1: 6 sc in MR (6)
- R2: 6 sc
Sew them to the head and embroider the eyes and mouth in black thread.
Collar and leash (red)
Ch 40. From the second chain: 1 slst, ch 3 (skip 3 chains), 35 slst, then continue with the handle — ch 9, attach to the beginning, cut and fasten off. Pass the handle through the hole and tighten it around the caterpillar’s neck.
Assembly notes
- Cardboard is what keeps the walls vertical, and it must be taped on both faces — bare cardboard softens in humid air and the house starts to lean within a week.
- Cut the plastic slightly smaller than the crochet, 2–3 mm in on every edge, so it cannot poke through the border round.
- The floor sits inside the walls, not under them: work the 86 joining stitches into the wall’s bottom edge and the floor’s edge at the same time.
- The cap is not attached with a hinge — it lifts off. Sew it only at four points around the top so it can be taken off and put back.
- Fit the doll’s arms and legs with a thread mount before sewing on the head: a single long needle through the body, pulled tight, lets the limbs move.
Notes
The rows of the walls are written out row by row because the openings fall in the middle of the alternation; if you lose your place, count from the door. The window opening is ten stitches wide and eight rows tall on the front wall, and the door is twenty stitches wide and thirteen rows tall.
If you only want one piece from this set, the cap works alone as a small basket lid and the caterpillar makes a 6 cm keyring charm.
More small creatures and play sets: Three Little Kittens is the three-in-one body with colour charts, Elephant Elf with Balloon is the one with a thread-mounted head, and Two-in-One Frog is the one that turns inside out. Everything is on the patterns page.
Pattern source: Amanita House — mushroom house, doll and caterpillar.
For the other wired piece on the site, Anglerfish SAM uses a copper frame in the jaw and every fin.
The other set with furniture in it is Doll Bed and Blanket, a cot built from a flat rectangle.
2 comments